This tutorial explains how to use grid view properly for displaying related entities in M:M Relationships (with Additional Fields).
When an additional field(s) is needed in M:M relationships, the relationship is decomposed into two separate 1:M relationships (please see this tutorial to learn configuring such relationships in code first entity framework).
Let’s consider the following example.
-
A player can be transferred to many teams (at different time points), and a team can have many players transferred.
- The words that are bold in the text above are the entities that will participate in the M:M relationship.
- If this was the all information that we need to define the relationship between the Team and Player entities, then all we need to do to configure the relationship would be:
- Defining Player class that has List<Team> Teams navigation property,
- Defining Team class that has List<Player> Players navigation property,
- Configuring the relationship with Fluent API by using HasMany(), WithMany(), and Map() methods properly. Please remember that Map() method helps to customize the linking table.
- Then, when we want to add data, that is, to register (or transfer) a player to a team, we would need to
- Either add the Team instance (i.e., myTeam) to the List<Team> Teams collection of the instance of Player (i.e., myPlayer):
- myPlayer.Teams.Add(myTeam);
- Or, add the Player instance (i.e., myPlayer) to the List<Player> Players collection of the instance of Team (i.e., myTeam):
- myTeam.Players.Add(myPlayer);
- Either add the Team instance (i.e., myTeam) to the List<Team> Teams collection of the instance of Player (i.e., myPlayer):
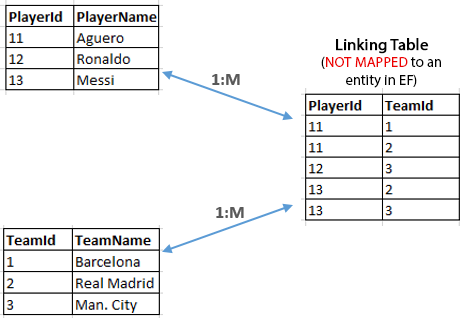
- IMPORTANT NOTE: Actually, every M:M relationship is a combination of two 1:M relationship as illustrated in the following figure:
- Thanks to the entity framework, we do not have to create an entity that maps to the linking table. When we configure this relationship in entity framework, actually, we pretend that there is no linking table, and that Player and Team entities are directly linked. However, actually they are indirectly linked through the linking table.
- By discarding the linking table, entity framework makes it easier to configure this relationship: instead of creating two separate 1:M relationships involving three entities (Player, Team, and Linking Table), we are able to create one M:M relationship that involves two entities (Player and Team).
This blog post covers the details of creating Many-to-Many relationships, and this blog post explains how to add data in Many-to-Many relationships.
Sometimes, M:M relationships may require additional fields to be stored in the linking table. For example, considering the example above, we may want to store additional information regarding the transfers of football players:
-
A transfer is identified with transfer fee, and the term (starting and ending years).
- With this additional specification, the way we configure this M:M relationship in Entity Framework will substantially change.
- We have to define our domain model within entity framework in a way that will allow to save a transfer record in the linking table with the following information: transfer fee, starting year, and ending year.
- To achieve this, we need to create a new entity in entity framework, called Transfer. This Transfer entity will have the properties (e.g., EndYear, StartYear, Price) that maps to the columns of the transfer table (linking table).
- Therefore, the linking table will be presented with the Transfer entity in the entity framework; when we create a new instance of the Transfer entity and add it to the database, it will be recorded to the transfer table.
- To configure this M:M relationship with additional fields in the linking table, we will need to set up two separate 1:M relationships, as seen in the following figure :
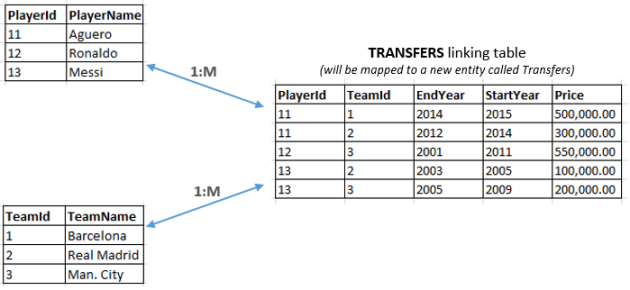
- The next steps involve configuring these two 1:M relationships by using Fluent API. Please refer to this tutorial for further explanation.
Challenge: How to Display the Player name and Team name in the Grid View listing the existing transfers
Before we started working on this challenge, we need to learn about customizing grid views.
Customizing GridView by using BoundFields
The following code simply bind the existing transfers to the grid view:
using (var db = new FootballDbContext())
{
    List<Transfer> allTransfers = db.Transfers.ToList();

    grd_Transfers.DataSource = allTransfers;
    grd_Transfers.DataBind();
}
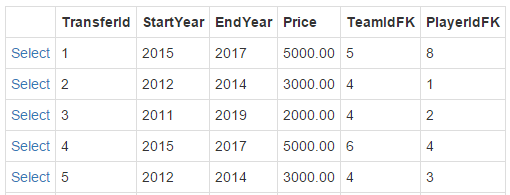
By default, Grid View will automatically generate a column displaying the value of each property defined in Transfer entity class:
To be able to manipulate the columns of a grid view, first we need to disable the auto-generation of the columns (by default the columns of grid view are generated according to the properties of the entity bound). We will disable this feature by setting AutoGenerateColumns property to false:
In Grid Views, the columns that were automatically generated are actually called BoundFields. In other were, when the columns were automatically generated, actually grid view was creating one BoundField per each property of the transfer entity (excluding complex types).
Since we do not let the grid view automatically generate the columns (or BoundFields), we need to add these BoundFields ourselves. There are two ways of achieving this. One way is to use the GridView Tasks window. To access this window, please click on the small arrow button on the top right of the GridView. From the small window, please click on Add New Column:
You should see the following window. Please enter the same values as indicated in the image below:
As you may notice in the window above, the type of the column is BoundField. BoundField helps us display the value of the property of the entity as a string in a grid view column.
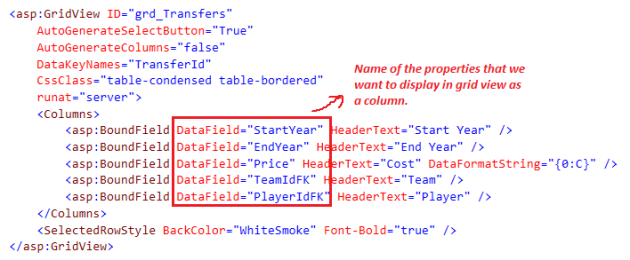
Above we added a BoundField to display the EndYear property value of Transfer entities as a column in the grid view. DataField property should be set to the name of the property that will be mapped to this column (or the property whose values will be displayed in this column).
When you check the html markup of the grid view, you will see that there is a <Column> tag and inside this tag there is <BoundField> tag:
<GridView ID="grd_Transfers" AutoGenerateColumns="False"
          AutoGenerateSelectButton="True" DataKeyNames="TransferId"
          OnSelectedIndexChanged="grd_Transfers_SelectedIndexChanged"
          CssClass="table-condensed table-bordered" runat="server">

     <Columns>
         <asp:BoundField DataField="EndYear" HeaderText="End Year">
     </Columns>

     <SelectedRowStyle BackColor="WhiteSmoke" Font-Bold="true" >
</asp:GridView>
Please note that BoundFields can be declared inside <Column> tag. Outside the <Column>, they are undefined.
Let’s add more columns:
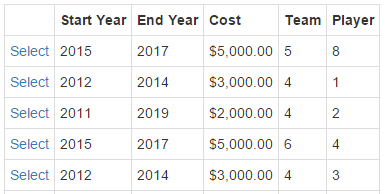
Now, the Grid View should look like this:
Here is the summary of what we achieved with BoundFields: we have chosen the particular fields of the transfer entities that want to display in the grid view, we also changed the header texts of the columns. These are all we can achieve actually with BoundFields. As its name implies, a property of an entity class has to be bound to a BoundField, which will then display its value as a string in one grid view column.
Using TemplateFields *
What if a particular field must display some text, a check box, and an image, all based upon different data-field values? Or what if we wanted to display the data using CheckBox, Image, HyperLink, or Button? Furthermore, the BoundField limits its display to a single data field. What if we wanted to show two or more data-field values in a single GridView column?
To accommodate this level of flexibility, the GridView offers the TemplateField. A TemplateField can include a mix of static HTML, Web controls, and data-binding syntax. In this tutorial, we’ll examine how to use the TemplateField to achieve a greater degree of customization with the GridView control. More specially, we will use TemplateFields (1) to display starting and ending years of the contract in a single column, and (2) to display the name of the team and the player that are involved in the transfers.
Displaying starting and ending years of the contract in a single column
We can either add a new TemplateField by manually typing the markup, and then delete the BoundFields named StartYear and EndYear, or we can convert the BoundFields named StartYear into a TemplateField, edit the TemplateField to include the EndYear value, and then remove the BoundField named EndYear.
Both approaches net the same result, however converting BoundFields to TemplateFields is more convenient, because the conversion automatically adds the required markup to mimic the appearance and functionality of the BoundField. The benefit is that we’ll need to do less work with the TemplateField, as the conversion process will have performed some of the work for us.
To convert an existing BoundField into a TemplateField, please click on the Edit Columns link from the GridView‘s smart tag (the small arrow button on top-right of the gridview), which brings up the Fields dialog box. Select the BoundField to convert from the list in the lower-left corner, and then click the Convert this field into a TemplateField link in the bottom-right corner.

Step 1 : Click Edit Columns link
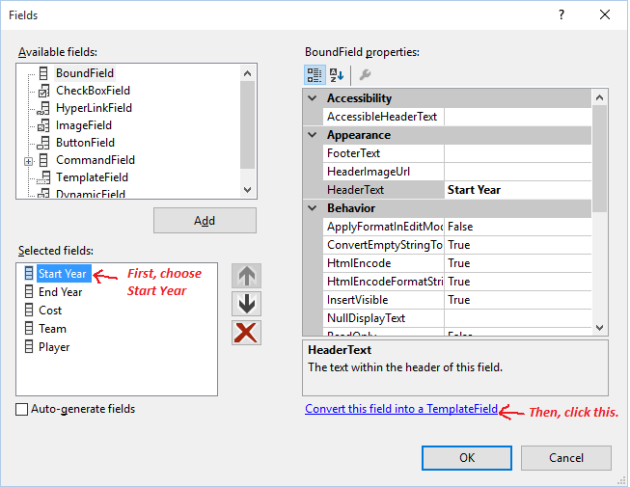
Step 2 : Choose StartYear, then click Covert this field into a TemplateField
Go ahead and convert the BoundField named StartYear into a TemplateField. After this change, there’s no perceptive difference in the Designer. This is because converting the BoundField into a TemplateField creates a TemplateField that maintains the look and feel of the BoundField. Despite there being no visual difference at this point in the Designer, this conversion process has replaced the BoundField‘s declarative syntax—<asp:BoundField DataField="StartYear" HeaderText="Start Year" />—with the following TemplateField syntax:

As you can see, the TemplateField consists of two templates: an ItemTemplate that has a Label whose Text property is set to the value of the StartYear data field, and an EditItemTemplate that has a TextBox control whose Text property also is set to the EndYear data field. The data-binding syntax—<%# Bind("fieldName") %>—indicates that the fieldName data field is bound to the specified Web control property. For the scope of this tutorial, we will discard the EditItemTemplate.
To add the EndYear data-field value to this TemplateField, we must add another Label Web control in the ItemTemplate and bind its Text property to EndYear:

However, using Bind() method is not very maintainable. For example, you many not always remember the name of the data-field exactly and you may sometimes put wrong field names.
Hopefully, being offered with ASP.NET 4.5 first time, Grid View (and some other data controls) provides a new property called ItemType. With this property we can directly tell Grid View the type of the entity that will be bound to it.
Let’s set ItemType to the Transfer class:

Setting the ItemType property causes Item variable to be automatically generated in the scope of the data-binding expressions.
The Item keyword will help us access properties of the Transfer entity (since ItemType was set to Transfer). As you type Item followed by a period in the editor you’ll actually get the list of the properties (or datafields) of the entity being bound as shown next:

Now, we achieved our first goal, displaying the start and end year data fields in a single column. Let’s move to the next one.
Displaying the name of the team and the player involved in a transfer
Please first convert the TeamIdFK and PlayerIdFK BoundFields into a template field (as explained above). You should have the following TemplateFields:

Let’s use the Item keyword to bind the TeamName and FullName (of Player) datafields:

Please run your application with debugging enabled. You should receive an error as illustrated below:
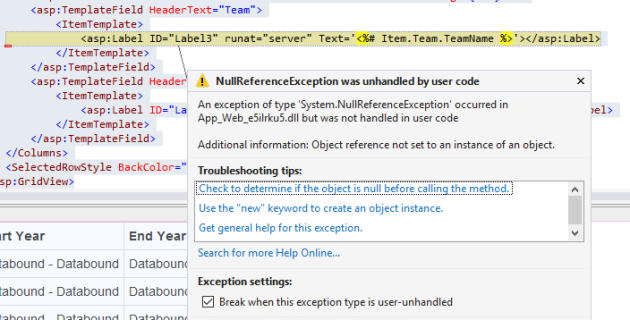
We received this NullReferenceException because Team and Player datafields of Transfer entity are null.
Remember that the transfer records were fetched with db.Transfers.ToList() in the code above. When we use the DbSet collection types (defined in the dbcontext class) such as Transfers (db.Transfers) to read some records from the database, we have access only to the table associated with the entity requested. That is, when we want to grab the transfer records from the database and bind them to the grid view, we can read rows only from the Transfer table.
We know that each transfer entity is associated with a team and a player, as implied by the Navigation properties:
public class Transfer
{
    public Team Team { get; set; }
    public int TeamIdFK { get; set; }

    public Player Player { get; set; }
    public int PlayerIdFK { get; set; }
}
Actually, we can ask for the associated team and player information, and store them in these Team and Player navigation properties when fetching the transfer records from the database. We use Include() keyword to grab the related entities along with the transfer entities:
using (var db = new FootballDbContext())
{
    List<Transfer> allTransfers = db.Transfers
                                    .Include("Team")
                                    .Include("Player")
                                   .ToList();

    grd_Transfers.DataSource = allTransfers;
    grd_Transfers.DataBind();
}
Normally, the Include() method receives a string parameter which is the name of the navigation property. Since we want both Team and Player entities included when Transfer entities are fetched, we needed two Include() methods after each other (the order would not matter).
If you include this statement at the top of your page: using Syste.Data.Entity, then you can use lambda expressions in Include() method:
List<Transfer> allTransfers = db.Transfers
                                .Include(tr => tr.Team)
                                .Include(tr => tr.Player)
                                .ToList();
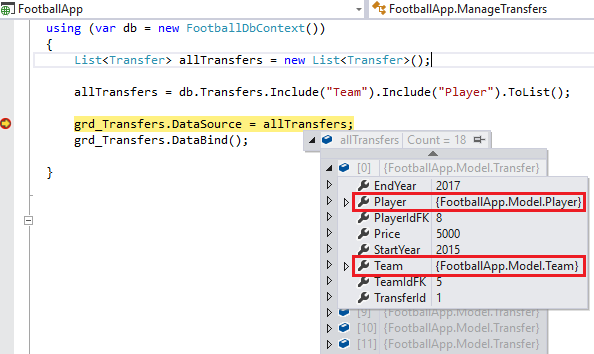
Let’s test our code in debugging mode (please put a break point to grd_Transfers.DataSource = allTransfers line):
As you may see, the Player and Team properties for each Transfer are correctly loaded, they are not NULL.
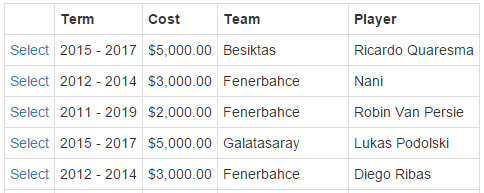
Let’s test our application again. No exceptions should be thrown, and you should see the grid view that we intended to have:
* Partially retrieved from https://msdn.microsoft.com/en-us/library/bb288032.aspx
