Displaying Related Data in M:M Relationships (with Additional Fields) by using GridView

This tutorial explains how to use grid view properly for displaying related entities in M:M Relationships (with Additional Fields).

When an additional field(s) is needed in M:M relationships, the relationship is decomposed into two separate 1:M relationships (please see this tutorial to learn configuring such relationships in code first entity framework).

Let’s consider the following example.

  • A player can be transferred to many teams (at different time points), and a team can have many players transferred.

    • The words that are bold in the text above are the entities that will participate in the M:M relationship.
    • If this was the all information that we need to define the relationship between the Team and Player entities, then all we need to do to configure the relationship would be:
      • Defining Player class that has List<Team> Teams navigation property,
      • Defining Team class that has List<Player> Players navigation property,
      • Configuring the relationship with Fluent API by using HasMany(), WithMany(), and Map() methods properly. Please remember that Map() method helps to customize the linking table.
    • Then, when we want to add data, that is, to register (or transfer) a player to a team, we would need to
      • Either add the Team instance (i.e., myTeam) to the List<Team> Teams collection of the instance of Player (i.e., myPlayer):
        • myPlayer.Teams.Add(myTeam);
      • Or, add the Player instance (i.e., myPlayer) to the List<Player> Players collection of the instance of Team (i.e., myTeam):
        • myTeam.Players.Add(myPlayer);
    • IMPORTANT NOTE: Actually, every M:M relationship is a combination of two 1:M relationship as illustrated in the following figure:
      • A player can be associated with many items in Linking Table, a linking table item is associated with ONLY one player, and similarly
      • A team can be associated with many items in Linking Table, a linking table item is associated with ONLY one player.9
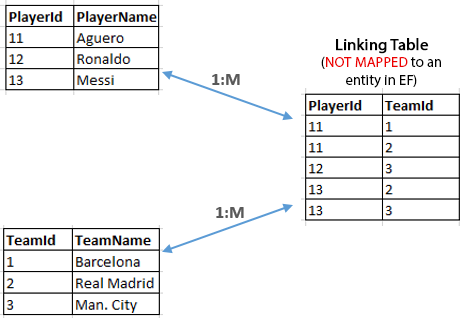
    • Thanks to the entity framework, we do not have to create an entity that maps to the linking table. When we configure this relationship in entity framework, actually, we pretend that there is no linking table, and that Player and Team entities are directly linked. However, actually they are indirectly linked through the linking table.
    • By discarding the linking table, entity framework makes it easier to configure this relationship: instead of creating two separate 1:M relationships involving three entities (Player, Team, and Linking Table), we are able to create one M:M relationship that involves two entities (Player and Team).

This blog post covers the details of creating Many-to-Many relationships, and this blog post explains how to add data in Many-to-Many relationships.

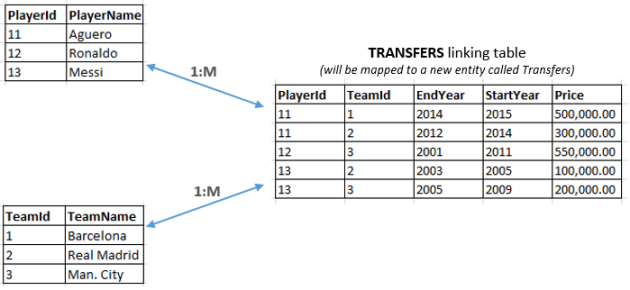
Sometimes, M:M relationships may require additional fields to be stored in the linking table. For example, considering the example above, we may want to store additional information regarding the transfers of football players:

  • A transfer is identified with transfer fee, and the term (starting and ending years).

    • With this additional specification, the way we configure this M:M relationship in Entity Framework will substantially change.
    • We have to define our domain model within entity framework in a way that will allow to save a transfer record in the linking table with the following information: transfer fee, starting year, and ending year.
    • To achieve this, we need to create a new entity in entity framework, called Transfer. This Transfer entity will have the properties (e.g., EndYear, StartYear, Price) that maps to the columns of the transfer table (linking table).
    • Therefore, the linking table will be presented with the Transfer entity in the entity framework; when we create a new instance of the Transfer entity and add it to the database, it will be recorded to the transfer table.
    • To configure this M:M relationship with additional fields in the linking table, we will need to set up two separate 1:M relationships, as seen in the following figure :

      2
  • The next steps involve configuring these two 1:M relationships by using Fluent API. Please refer to this tutorial for further explanation.

Challenge: How to Display the Player name and Team name in the Grid View listing the existing transfers 

Before we started working on this challenge, we need to learn about customizing grid views.

Customizing GridView by using BoundFields 

The following code simply bind the existing transfers to the grid view:

using (var db = new FootballDbContext())
{
    List<Transfer> allTransfers = db.Transfers.ToList();

    grd_Transfers.DataSource = allTransfers;
    grd_Transfers.DataBind();
}

By default, Grid View will automatically generate a column displaying the value of each property defined in Transfer entity class:

12

To be able to manipulate the columns of a grid view, first we need to disable the auto-generation of the columns (by default the columns of grid view are generated according to the properties of the entity bound). We will disable this feature by setting AutoGenerateColumns property to false:

13

In Grid Views, the columns that were automatically generated are actually called BoundFields. In other were, when the columns were automatically generated, actually grid view was creating one BoundField per each property of the transfer entity (excluding complex types).

Since we do not let the grid view automatically generate the columns (or BoundFields), we need to add these BoundFields ourselves. There are two ways of achieving this. One way is to use the GridView Tasks window. To access this window, please click on the small arrow button on the top right of the GridView. From the small window, please click on Add New Column:

6

You should see the following window. Please enter the same values as indicated in the image below:

7

As you may notice in the window above, the type of the column is BoundField. BoundField helps us display the value of the property of the entity as a string in a grid view column.

Above we added a BoundField to display the EndYear property value of Transfer entities as a column in the grid view. DataField property should be set to the name of the property that will be mapped to this column (or the property whose values will be displayed in this column).

When you check the html markup of the grid view, you will see that there is a <Column> tag and inside this tag there is <BoundField> tag:

<GridView ID="grd_Transfers" AutoGenerateColumns="False"
          AutoGenerateSelectButton="True" DataKeyNames="TransferId"
          OnSelectedIndexChanged="grd_Transfers_SelectedIndexChanged"
          CssClass="table-condensed table-bordered" runat="server">

     <Columns>
         <asp:BoundField DataField="EndYear" HeaderText="End Year">
     </Columns>

     <SelectedRowStyle BackColor="WhiteSmoke" Font-Bold="true" >
</asp:GridView>

Please note that BoundFields can be declared inside <Column> tag. Outside the <Column>, they are undefined.

Let’s add more columns:

14

Now, the Grid View should look like this:

15

Here is the summary of what we achieved with BoundFields: we have chosen the particular fields of the transfer entities that want to display in the grid view, we also changed the header texts of the columns. These are all we can achieve actually with BoundFields. As its name implies, a property of an entity class has to be bound to a BoundField, which will then display its value as a string in one grid view column.

Using TemplateFields *

What if a particular field must display some text, a check box, and an image, all based upon different data-field values? Or what if we wanted to display the data using  CheckBox, Image, HyperLink, or Button? Furthermore, the BoundField limits its display to a single data field. What if we wanted to show two or more data-field values in a single GridView column?

To accommodate this level of flexibility, the GridView offers the TemplateField. A TemplateField can include a mix of static HTML, Web controls, and data-binding syntax. In this tutorial, we’ll examine how to use the TemplateField to achieve a greater degree of customization with the GridView control. More specially, we will use TemplateFields (1) to display starting and ending years of the contract in a single column, and (2) to display the name of the team and the player that are involved in the transfers.

Displaying starting and ending years of the contract in a single column

We can either add a new TemplateField by manually typing the markup, and then delete the BoundFields named StartYear and EndYear, or we can convert the BoundFields named StartYear into a TemplateField, edit the TemplateField to include the EndYear value, and then remove the BoundField named EndYear.

Both approaches net the same result, however converting BoundFields to TemplateFields is more convenient, because the conversion automatically adds the required markup to mimic the appearance and functionality of the BoundField. The benefit is that we’ll need to do less work with the TemplateField, as the conversion process will have performed some of the work for us.

To convert an existing BoundField into a TemplateField, please click on the Edit Columns link from the GridView‘s smart tag (the small arrow button on top-right of the gridview), which brings up the Fields dialog box. Select the BoundField to convert from the list in the lower-left corner, and then click the Convert this field into a TemplateField link in the bottom-right corner.

16

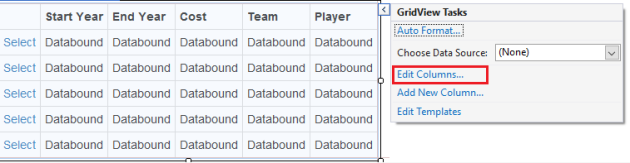
Step 1 : Click Edit Columns link

17

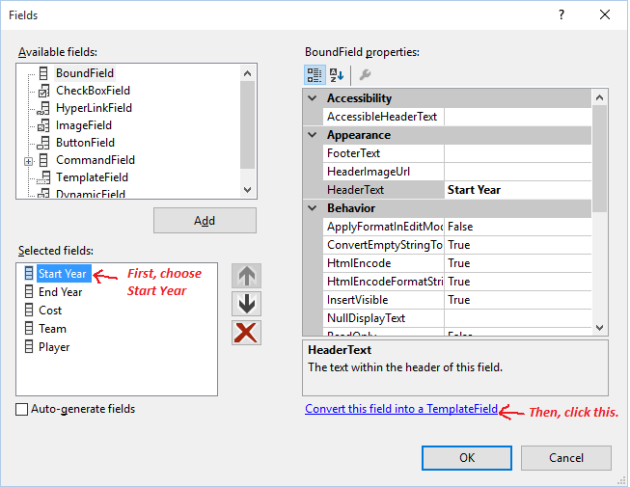
Step 2 : Choose StartYear, then click Covert this field into a TemplateField

Go ahead and convert the BoundField named StartYear into a TemplateField. After this change, there’s no perceptive difference in the Designer. This is because converting the BoundField into a TemplateField creates a TemplateField that maintains the look and feel of the BoundField. Despite there being no visual difference at this point in the Designer, this conversion process has replaced the BoundField‘s declarative syntax—<asp:BoundField DataField="StartYear" HeaderText="Start Year" />—with the following TemplateField syntax:

18

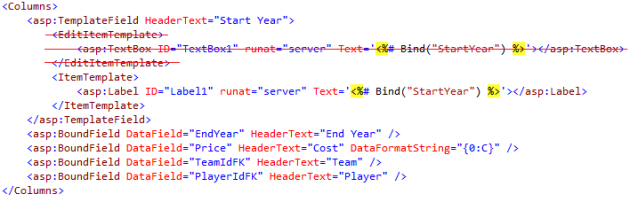
As you can see, the TemplateField consists of two templates: an ItemTemplate that has a Label whose Text property is set to the value of the StartYear data field, and an EditItemTemplate that has a TextBox control whose Text property also is set to the EndYear data field. The data-binding syntax—<%# Bind("fieldName") %>—indicates that the fieldName data field is bound to the specified Web control property. For the scope of this tutorial, we will discard the EditItemTemplate.

To add the EndYear data-field value to this TemplateField, we must add another Label Web control in the ItemTemplate and bind its Text property to EndYear:

19

However, using Bind() method is not very maintainable. For example, you many not always remember the name of the data-field exactly and you may sometimes put wrong field names.

Hopefully, being offered with ASP.NET 4.5 first time, Grid View (and some other data controls) provides a new property called ItemType. With this property we can directly tell Grid View the type of the entity that will be bound to it.

Let’s set ItemType to the Transfer class:

20

Setting the ItemType property causes Item variable to be automatically generated in the scope of the data-binding expressions.

The Item keyword will help us access properties of the Transfer entity (since ItemType was set to Transfer). As you type Item followed by a period in the editor you’ll actually get the list of the properties (or datafields) of the entity being bound as shown next:

21

Now, we achieved our first goal, displaying the start and end year data fields in a single column. Let’s move to the next one.

Displaying the name of the team and the player involved in a transfer

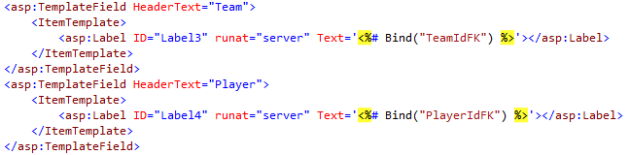
Please first convert the TeamIdFK and PlayerIdFK BoundFields into a template field (as explained above). You should have the following TemplateFields:

22

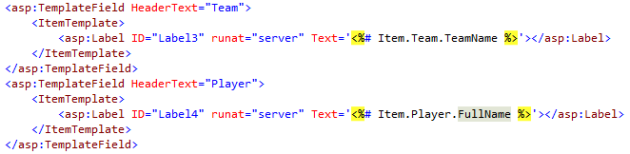
Let’s use the Item keyword to bind the TeamName and FullName (of Player) datafields:

23.png

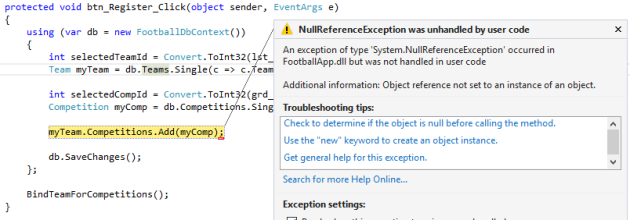
Please run your application with debugging enabled. You should receive an error as illustrated below:

24

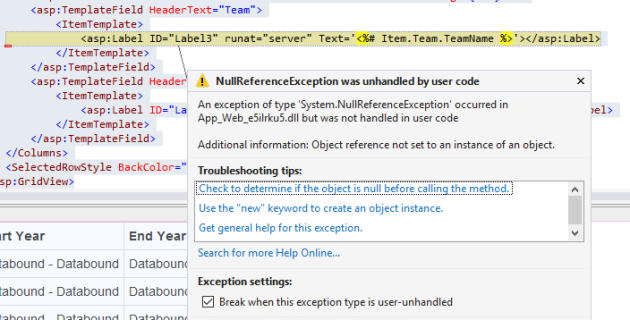
We received this NullReferenceException because Team and Player datafields of Transfer entity are null.

Remember that the transfer records were fetched with db.Transfers.ToList() in the code above. When we use the DbSet collection types (defined in the dbcontext class) such as Transfers (db.Transfers) to read some records from the database, we have access only to the table associated with the entity requested. That is, when we want to grab the transfer records from the database and bind them to the grid view, we can read rows only from the Transfer table.

We know that each transfer entity is associated with a team and a player, as implied by the Navigation properties:

public class Transfer
{
    public Team Team { get; set; }
    public int TeamIdFK { get; set; }

    public Player Player { get; set; }
    public int PlayerIdFK { get; set; }
}

Actually, we can ask for the associated team and player information, and store them in these Team and Player navigation properties when fetching the transfer records from the database. We use Include() keyword to grab the related entities along with the transfer entities:

using (var db = new FootballDbContext())
{
    List<Transfer> allTransfers = db.Transfers
                                    .Include("Team")
                                    .Include("Player")
                                   .ToList();

    grd_Transfers.DataSource = allTransfers;
    grd_Transfers.DataBind();
}

Normally, the Include() method receives a string parameter which is the name of the navigation property. Since we want both Team and Player entities included when Transfer entities are fetched, we needed two Include() methods after each other (the order would not matter).

If you include this statement at the top of your page: using Syste.Data.Entity, then you can use lambda expressions in Include() method:

List<Transfer> allTransfers = db.Transfers
                                .Include(tr => tr.Team)
                                .Include(tr => tr.Player)
                                .ToList();

Let’s test our code in debugging mode (please put a break point to grd_Transfers.DataSource = allTransfers line):

11

As you may see, the Player and Team properties for each Transfer are correctly loaded, they are not NULL.

Let’s test our application again. No exceptions should be thrown, and you should see the grid view that we intended to have:

25

* Partially retrieved from https://msdn.microsoft.com/en-us/library/bb288032.aspx


Many-to-Many Relationships with Additional Fields

This tutorial explains how to implement Many-to-Many relationships with additional columns in entity framework code first. If you want to learn basics of Many-to-Many relationships in entity framework please refer to this blog post.

Consider this M:M relationship example: a student can enroll MANY courses, and a course can have MANY students enrolled. It is relatively straightforward to implement this relationship in entity framework (as explained in this blog post). If we need to record the date of the enrollments, then the way we implement this relationship will significantly change. To record the enrollment dates, we will need to add a new column to the Linking Table. Adding an additional column to the Linking Table requires major changes in the configuration of the M:M relationship.

Linking Table

1

Configuring Many-To-Many (M:M) Relationships with Additional Fields

In these M:M scenarios where additional field is needed, we will consider this M:M relationship as a combination of two 1:M relationships.

For example, consider this example: A football player can be associated with MANY football teams (current or past), and a football team can have MANY players (current or past). In this relationship, we need to record additional information about this transfer such as the starting year and ending year of the contract, and the price of the transfer. Let’s call our linking table as Transfers.

We could name the linking table as TeamPlayers by combining the names of the other two entities. However, we preferred to give a unique name, Transfers, to the linking table independent from the other two entities. This is because now we treat Transfers table not only as a linking table but also as a table that will represent Transfer entities. Therefore, we will create the Transfer class in the domain model.

2

Based on the figure above, now we have three separate entities, and two 1:M relationships among these entities:

  • A transfer can involve ONLY and ONLY ONE player; a player can be involved in MANY transfers (at different time points),
  • A transfer can involve ONLY and ONLY ONE team; a team can perform MANY transfers.

Therefore, in a many-to-many relationship if there are additional fields (or information) that defines the relationship, these fields are actually attached to the linking table, converting the linking table into an Entity table to which an entity from the domain model can be mapped. In our case, we named the linking table as Transfers table which will store the Transfer entities.

Working on an Example

Configuring Many-to-Many Relationships with additional fields is actually the same as configuring two separate 1-to-Many relationship: 1) Transfer – Team, 2) Transfer – Player.

Please note that the linking entity, Transfer, will be always the child (or dependent) entity in two separate 1-M relationship it participates in. Therefore, foreign key properties should be declared in Transfer entity class. The following code declares the Transfer class:

public class Transfer
{
    public int TransferId { get; set; }
 
    public int StartYear { get; set; }
    public int EndYear { get; set; }
    public Double Price { get; set; }

    public Team Team { get; set; }
    public int TeamIdFK { get; set; }

    public Player Player { get; set; }
    public int PlayerIdFK { get; set; }
}

You may notice that there are two Navigation properties defined: Team and Player. This is because each transfer instance is identified by a certain team and player (or each transfer involves only one team and only one player). Therefore, we have two foreign key properties, TeamIdFK and PlayerIdFK, pointing to the corresponding navigation property.

Let’s declare the Team class:

public class Team
{
    public int TeamId { get; set; }

    public string TeamName { get; set; }

    public int YearEstablished { get; set; }

    public List<Transfer> Transfers { get; set; }
}

The Team entity has a List type navigation property, Transfers, that indicates a team entity can be associated with multiple instances of transfers. With the help of this navigation property, entity framework code first will be able to infer that every team can do have many transfers.

Similarly, Player class will have a List type navigation property, Transfers, which implies that a player can be involved in many transfers. Here is the declaration of the Player class:

public class Player
{
    public int PlayerId { get; set; }

    public string FullName { get; set; }

    public int BirthYear { get; set; }

    public int LisenceYear { get; set; }

    public List<Transfer> Transfers { get; set; }
}

To finish the configuration of these relationship, we will need to have the following fluent api:

protected override void OnModelCreating(DbModelBuilder modelBuilder)
{
    modelBuilder.Entity<Player>()
                .HasMany(p => p.Transfers)
                .WithRequired(t => t.Player)
                .HasForeignKey(t => t.PlayerIdFK);

    modelBuilder.Entity<Team>()
                .HasMany(te => te.Transfers)
                .WithRequired(tr => tr.Team)
                .HasForeignKey(tr => tr.TeamIdFK);
}

If you have trouble understanding the code above please review this blog post.

Using Package Manager Console, please execute the following commands “add-migration MM1” and “update-database” to map our model to the database.

When you browse and open the database, you will see that there are 3 tables in the database representing its corresponding entity:

  • Transfers: The table to which Transfer entity is mapped,
  • Teams: The table to which Team entity is mapped,
  • Players: The table to which Player entity is mapped.

3

Our database is ready. Now we can create a new web form for managing transfers.

ManageTransfers.aspx Web Form

Please create a new web form called ManageTransfers.aspx in your application. It should have an interface similar to the following:

4

If you are not familiar with managing data in One-To-Many relationships please check this tutorial.

Creating a new transfer (Connected Approach)

The following code adds a new transfer instance to the database. Please note that the foreign key values are grabbed from the corresponding drop down lists.

protected void btn_CreateCourse_Click(object sender, EventArgs e)
{
    using (var db = new FootballDbContext())
    {
        Transfer transfer = new Transfer()
        {
             Price = Convert.ToInt32(txt_NewCost.Text),
             StartYear = Convert.ToInt32(txt_NewEndYear.Text),
             EndYear = Convert.ToInt32(txt_NewStartYear.Text),
             PlayerIdFK = Convert.ToInt32(drp_NewPlayerInvolved.SelectedValue),
             TeamIdFK = Convert.ToInt32(drp_NewTeamInvolved.SelectedValue)
        };

        db.Transfers.Add(transfer);

        db.SaveChanges();
    }
}

Update/delete a transfer

protected void btn_Update_Click(object sender, EventArgs e)
{
     using (var db = new FootballDbContext())
     {
         int transferid = Convert.ToInt32(grd_Transfers.SelectedValue);

         Transfer transfer = db.Transfers.Find(transferid);

         transfer.Price = Convert.ToDecimal(txt_UpdateCost.Text);
         transfer.StartYear = Convert.ToInt32(txt_UpdateEndYear.Text);
         transfer.EndYear = Convert.ToInt32(txt_UpdateStartYear.Text);

         db.SaveChanges();
     }
}
protected void btn_Delete_Click(object sender, EventArgs e)
{
    using (var db = new FootballDbContext())
    {
        int transferid = Convert.ToInt32(grd_Transfers.SelectedValue);

        Transfer transfer = new Transfer() { TransferId = transferid };

        db.Entry(transfer).State = System.Data.Entity.EntityState.Deleted;

        db.SaveChanges();
     } 
}

Filtering the Transfers

The following code filters the transfers by a chosen team and or player. If you have trouble understanding the following code, and want to learn more about IQueryable please refer to this tutorial.

using (var db = new FootballDbContext())
{
    IQueryable<Transfer> allTransfers = db.Transfers;

    if (drp_PlayerFilter.SelectedIndex > 0)
    {
         int selectedPlayerId = Convert.ToInt32(drp_PlayerFilter.SelectedValue);
         allTransfers = allTransfers.Where(t => t.PlayerIdFK == selectedPlayerId);
    }

    if (drp_TeamFilter.SelectedIndex > 0)
    {
         int selectedTeamId = Convert.ToInt32(drp_TeamFilter.SelectedValue);
         allTransfers = allTransfers.Where(t => t.TeamIdFK == selectedTeamId);
    }
    grd_Transfers.DataSource = allTransfers.ToList();
    grd_Transfers.DataBind();
}

Managing Data in Many-To-Many Relationships with Entity Framework Code First

In this tutorial, I discuss how to add/remove entities in M:M relationships (entity framework code first) through an example. This tutorial covers following topics:

  • Creating and Configuring M:M Relationships by using Fluent API,
  • Adding/Deleting records in M:M Relationships with Connected/Disconnected Approaches,
  • Loading Related Entities,
  • Writing complex Linq queries in M:M Relationships,
  • Adding/Updating/Deleting simple entities, Competitions in this tutorial, with Entity Framework Code-First

Let’s first see how the final application will look like.

The Description of the Application

We will build a page to manage Competitions in a football application. Initially, the competitions page will include a Grid View (with Select buttons) that lists the existing competitions. There will be also a link (New Competition?) under the grid view, and this link will show the form for adding a new competition.

1

When a competition is selected from the grid view, the following panel with blue background should be displayed.

2

In this panel there are two sections:

  • An update form where the user can update (or delete) the selected competition (note that the form is populated with the existing information of the competition)
  • A team registration form where you the user can register/unregister teams for the selected competition.

Last, there will be a form for adding a new competition record. This form will be displayed when user clicks on “New Competition?” link:

3

Model

Our model is composed of two classes: Competition and Team. There is a many-to-many relationship between these two entities. Here are the class declaration of these two classes:


public class Competition
{
    public int CompetitionId { get; set; }

    public string CompetitionName { get; set; }

    public bool IsInternational { get; set; }

    public int Year { get; set; }

    public List ParticipatingTeams { get; set; }
}

public class Team
{
    public int TeamId { get; set; }

    public string TeamName { get; set; }

    public int YearEstablished { get; set; }

    public List Competitions { get; set; }
}

Fluent API for configuring the relationship

The fluent api sets up the M:M relationship between Team and Competition entities. If you have trouble understanding the following code please refer to the previous tutorial.

protected override void OnModelCreating(DbModelBuilder modelBuilder)
{
    modelBuilder.Entity()
                .HasMany(c => c.ParticipatingTeams)
                .WithMany(t => t.Competitions)
                .Map(
                       m => m.ToTable("CompetitionsOfTeams")
                             .MapLeftKey("CompetitionId")
                             .MapRightKey("TeamId")
                );
}

INFORMATION

Please note that the following section first explains how to select a row in grid view and add/delete entry in M:M relationships. Then, it describes the other parts of the application, such as adding/deleting/updating competition entities.

Adding/Deleting in M:M Relationships: Add/Remove a Team to/from a Competition

Displaying existing Competitions with GridView

In the code below, we create a method named BindCompetitions() and called this method inside Page_Load. BindCompetitions() method uses Competitions dbset defined in dbcontext class to retrieve the existing competition records (db.Competitions.ToList()), then uses DataSource property of Grid View to attach the competition records to the grid view, and then executes BindData() method to bind the attached records to the grid view.

protected void Page_Load(object sender, EventArgs e)
{
    if (!Page.IsPostBack)
    {
        BindCompetitions();
    }
}

public void BindCompetitions()
{
    using (var db = new FootballDbContext())
    {
         grd_Competitions.DataSource = db.Competitions.ToList();
         grd_Competitions.DataBind();
    }
}

Enabling Select Button in GridView

To be able to perform any operation on a competition, first we need to be able to select it from the grid view. We can use GridView property called AutoGenerateSelectButton property to automatically generate Select button per each grid view row. Below is the html mark up of the grid view:

<GridView ID="grd_Competitions" AutoGenerateSelectButton="true" DataKeyNames="CompetitionId" OnSelectedIndexChanged="grd_Competitions_SelectedIndexChanged" CssClass="table-condensed table-bordered" runat="server">
<SelectedRowStyle BackColor="WhiteSmoke" Font-Bold="true"/>
</asp:GridView>
  • AutoGenerateSelectButton = “true” will attach a Select button at the beginning of each row,
  • DataKeyNames=”CompetitionId” will attach the competitionid key value to each row which points to a competition instance, this way we will be able to read the id of the selected competition instance (i.e., row) and use this id for retrieving the registered teams and to add to or remove from competitions,
  • OnSelectedIndexChanged=”grd_Competitions_SelectedIndexChanged” will create an event handler and this handler will be executed when a user selects a row (i.e., Competition).
  • SelectedRowStyle tag help us format the selected rows so that we can easily identify the selected row.

 Adding/Removing Teams to/from Competitions

Now we will learn how to add a team to a competition, or how to remove a team from a competition. Our focus will be the buttons highlighted in the following image. We will implement how to list the existing teams and registered teams in the next step.

4

Registering a Team with Connected Approach

In this part, we will learn how to add a team to a competition with connected approach. With this approach we will directly work on entities that are fetched from the database and attached to the dbcontext.

protected void btn_Register_Click(object sender, EventArgs e)
{
    using (var db = new FootballDbContext())
    {
         //get the id of the selected team from the listbox (on the left)
         int selectedTeamId = Convert.ToInt32(lst_AllTeams.SelectedValue);
         //
         //Fetch the team entity from the database and attach it to the context.
         Team myTeam = db.Teams.Single(c => c.TeamId == selectedTeamId);
         //
         //
         //get the id of the selected competition from the grid view
         int selectedCompId = Convert.ToInt32(grd_Competitions.SelectedValue);
         //
         //Fetch the competition entity from the database and attach it to the context
         Competition myComp = db.Competitions.Single(c => c.CompetitionId == selectedCompId);        
         //
         //add the competition to the Competitions list of myTeam instance
         myTeam.Competitions.Add(myComp);

         //save changes
         db.SaveChanges();
    };
    //This method is implemented in the following sections.
    BindTeamForCompetitions();
}

The code above is actually straightforward. We have our Team instance and Competition instance attached to the context properly, and we add the Competition instance to the Competitions collection of the Team instance.

However, this will not work. If you attempt to test the click event above, you should see the following NullReferenceException error:

5

To better understand the source of this error, let’s closely examine the myTeam instance. As you may see, its Competitions is not instantiated and it has a null reference.

6

That is, db.Teams did not bring the related data of the Team instance. What db.Teams does is to map ONLY the Teams table in the database to a list, and not fetch any related records from other tables by default. We have to explicitly tell entity framework that we want Competitions collection of the team to be loaded as well so that we can have a valid Competitions collection and add our new competition to this list.

Loading related data

To fetch a Team from the database along with its Competitions, we need to use Include method. Include method receives the Navigation property name as the parameter. You may check the Team class, you will see that there is a navigation property named Competitions, pointing to the Competition entity which is the related entity of the Team that we want to load.

Team myTeam = db.Teams
                .Include("Competitions")
                .Single(c => c.TeamId == selectedTeamId);

If you want to use Lambda expression to point to the navigation property, you will need to include the following library in your page:


using System.Data.Entity;

Then, you can use lambda expression Include() method like this:

Team myTeam = db.Teams
                .Include(t=>t.Competitions)
                .Single(c => c.TeamId == selectedTeamId);

The advantage of using Lambda expression in Include method is that you can correctly choose the Navigation property from the provided list. However, when you use the string Navigation property name as parameter, you need to remember it correctly.

After updating the code with Include() method, let’s test the application. If you debug your code, you should see that Competitions collection of myTeam instance is not null.

7

Registering a Team with Disconnected Approach

The following does the exact same thing that we have just done in the previous code. However, compared to previous approach, it does not connect to the database until registering the team to the selected competition at the end of the code. Please see the comments provided within the code for the explanation.

using (var db = new FootballDbContext())
{
    int selectedTeamId = Convert.ToInt32(lst_AllTeams.SelectedValue);

    //Team instance with only TeamId provided
    Team myTeam = new Team() { TeamId = selectedTeamId };

    //Attach myTeam to the context with state set to Unchanged
    //The state needs to be 'unchanged'
    //because we don't want to update/add/delete myTeam
    db.Entry(myTeam).State = System.Data.Entity.EntityState.Unchanged;
    int selectedCompId = Convert.ToInt32(grd_Competitions.SelectedValue.ToString());

    //Competition instance with only CompetitionId provided
    Competition myComp = new Competition() { CompetitionId = selectedCompId };

    //Attach myComp to the context with state set to Unchanged
    //The state needs to be 'unchanged' 
    //because we don't want to update/add/delete myComp
    db.Entry(myComp).State = System.Data.Entity.EntityState.Unchanged;

    //We initiate the List<Competition> with one value: myComp
    myTeam.Competitions = new List<Competition>() { myComp };

    db.SaveChanges();
};

SQL Query Approach

Or, as another disconnected approach, we could write an sql query to add a new record to the JunctionTable, which is CompetitionsOfTeams as configured in the fluent api.

db.Database.ExecuteSqlCommand("INSERT INTO CompetitionsOfTeams(CompetitionId, TeamId)" +
                              " VALUES(" + selectedCompId + ", " + selectedTeamId + ")");

If you are familiar with writing SQL queries, this approach might be very convenient to implement. This approach is the fastest one introduced in this tutorial.

Unregistering a Team with Connected Approach

The code for removing a team from a competition is exactly the same with the code for adding a team to a competition. The only difference is that instead of Add() method (myTeam.Competitions.Add()) we will use Remove() method (myTeam.Competitions.Remove()). Please see the details of the code below:


protected void btn_UnRegister_Click(object sender, EventArgs e)
{
    using (var db = new FootballDbContext())
    {
       int selectedTeamId = Convert.ToInt32(lst_RegisteredTeams.SelectedValue);
       Team myTeam = db.Teams.Include("Competitions").Single(c => c.TeamId == selectedTeamId);

       int selectedCompId = Convert.ToInt32(grd_Competitions.SelectedValue.ToString());
       Competition myComp = db.Competitions.Single(c => c.CompetitionId == selectedCompId);
       //
       //this is where we use Remove method instead of Add
       myTeam.Competitions.Remove(myComp);

       db.SaveChanges();
    };

    BindTeamForCompetitions();
}

Unregistering a Team with Disconnected Approach

The following code executes a SQL delete command to unregister the team.

db.Database.ExecuteSqlCommand("DELETE FROM CompetitionsOfTeams " +
                              "WHERE CompetitionId=" + selectedCompId +
                              " AND TeamId=" + selectedTeamId);

Advance Linq Queries in M:M Relationships: Filtering Teams by the Selected Competition

The following code illustrates how to generate

  • the list of Teams that registered to the selected competition (regTeams),
  • the list of Teams that are not registered to the selected competition (unregTeams).

After generating these lists, it binds them to the corresponding list controls.


public void BindTeamForCompetitions()
{
    using (var db = new FootballDbContext())
    {
        int selectedCompId = Convert.ToInt32(grd_Competitions.SelectedValue.ToString());

        //This fetches ALL teams with no filter
        //along with the Competition entities attached
        //thanks to Include() method
        List<Team> allTeams = db.Teams
                                .Include(t => t.Competitions)
                                .ToList();

        List<Team> regTeams = new List<Team>();

        foreach (Team team in allTeams)//iterate through teams
        {
             //this will create a collection composed of 
             //the IDs of the competitions in which
             //the current team participates, e.g., [1, 4]
             List<int> comps = team.Competitions.Select(c => c.CompetitionId);
             //
             //Then we check if this collection of IDs contains 
             //the selected competition id, if it contains
             //this means the current team is registered to 
             //the competition, and
             //then we add this team to the regTeams list
             if (comps.Contains(selectedCompId))
                  regTeams.Add(team);
        }

        List<Team> unregTeams = new List<Team>();
        //We can use Except() method to filter out the 
        //registered teams from all teams,
        //leaving only the teams that are not registered
        //to the selected competition
        unregTeams = allTeams.Except(regTeams).ToList();

 
        lst_AllTeams.DataSource = regTeams
        lst_AllTeams.DataValueField = "TeamId";
        lst_AllTeams.DataTextField = "TeamName";
        lst_AllTeams.DataBind();


        lst_RegisteredTeams.DataSource = unregTeams;
        lst_RegisteredTeams.DataValueField = "TeamId";
        lst_RegisteredTeams.DataTextField = "TeamName";
        lst_RegisteredTeams.DataBind();
    };
}

The approach followed above is actually not very performance effective. This is because we fetched all the teams from the database to the server memory, and do several operations on the existing teams to generate two list of teams: registered and unregistered teams. And, all these happened in the server memory.

Instead, we can write a single linq query to retrieve the registered teams like this:


List<Team> regTeams = new List<Team>();
regTeams = db.Teams
             .Where(
                      team => team.Competitions
                                  .Select(c => c.CompetitionId)
                                  .Contains(selectedCompId)
                   ).ToList();

The code above actually repeats the same code that we wrote previously, just with different structure. The following visual illustrates the code common in two approaches:

8

Similar to foreach, the Where() also iterates through the Teams, and for each team item it checks if the IDs of the competitions participated by the team includes the id of the selected competition by using Contains() method. If it contains, then Where() will automatically include the team instance in the result set. The same was achieved with the previous approach by using a IF condition and regTeams.Add(team).

Writing a single Linq statement with Lambda Expression will have substantial performance gains because it will filter the teams in the database server, preventing processing and memory costs in the server. That is, it will generate a single sql query and execute it in the database sever, and fetch the filtered results to the server memory.

We can get the list of teams which are not registered in the selected competition with a very similar query. Only difference is ” ! ” (not) :


List<Team> unregTeams = new List<Team>();
unregTeams = db.Teams
             .Where(
                      team => !team.Competitions
                                   .Select(c => c.CompetitionId)
                                   .Contains(selectedCompId)
                   ).ToList();

The Rest of the Implementation

Adding a New Competition

The following code illustrates how to add a new Competition record. Short explanations are provided within the text.

protected void btn_CreateCompetition_Click(object sender, EventArgs e)
{
    using (var db = new FootballDbContext())
    {
        //first create a new instance of competition with the user input
        Competition newComp = new Competition()
        {
             CompetitionName = txt_CompetitionName.Text,
             IsInternational = chk_IsInternational.Checked,
             Year = Convert.ToInt32(txt_Year.Text)
        };
        //using dbcontext insert the new competition instance to the database
        //by using Competitions dbset declared in the dbcontext class
        db.Competitions.Add(newComp);
        //
        //or, instead of db.Competitions.Add(newComp) you could use 
        //the following for the same purpose, it is the same:
        //db.Entity(newComp).State = System.Data.Entity.EntityState.Added;
        
        db.SaveChanges();

        //bind existing competitions to the grid view
        BindCompetitions();
    }
}

//Click event handler of "New Competition?" button
protected void lbtn_ShowForm_Click(object sender, EventArgs e)
{
     //Display/hide the form 
     pnl_NewCompetitionForm.Visible = !pnl_NewCompetitionForm.Visible;
}

Updating/Deleting a Competition

As you may remember, when a competition is selected from the grid view, the following blue panel should be displayed.

2

Populate Update Form

The following code is the handler for OnSelectedIndexChanged event.

protected void grd_Competitions_SelectedIndexChanged(object sender, EventArgs e)
{
    //this the panel with blue background
    pnl_ActionSet.Visible = true;

    using (var db = new FootballDbContext())
    {
        int selectedCompId = Convert.ToInt32(grd_Competitions.SelectedValue.ToString());

        //Find() method fetches the entry from the database based on the provided id
        Competition myComp = db.Competitions.Find(selectedCompId);
        
        if (myComp != null)
        {
             txt_NewCompetitionName.Text = myComp.CompetitionName;
             txt_NewYear.Text = myComp.Year.ToString();
             chk_NewIsInternational.Checked = myComp.IsInternational;
        }
    }
}

In the code above, we used Find() method to fetch the Competition record from the database based on the provided competition id. The Find() method is handy when a single entity needs to be fetched from the database and its id is known. Then, we read the properties of the Competition record and assign them to the corresponding fields.

Update Competition with Connected Approach

With connected approach, we need to first fetch the competition record that we want to update and store in the memory as a competition instance. Then, we need to assign the new values (provided by the user) to the corresponding properties of the competition instance.


protected void btn_Update_Click(object sender, EventArgs e)
{
     using (var db = new FootballDbContext())
     {
         int selectedCompId = Convert.ToInt32(grd_Competitions.SelectedValue.ToString());

         Competition updatedComp = db.Competitions.Single(c => c.CompetitionId == selectedCompId);

         updatedComp.CompetitionName = txt_NewCompetitionName.Text;
         updatedComp.Year = Convert.ToInt32(txt_NewYear.Text);
         updatedComp.IsInternational = chk_NewIsInternational.Checked;

         db.SaveChanges();

     }

     BindCompetitions();
}

Although this approach is simple to implement, it uses server memory inefficiently because it requires to load the entire competition instance to the memory although we will not use the values of its properties (e.g., competition name or year).

Update Competition with Disconnected Approach

With Disconnected approach, we create a new instance of Competition with the new user input. Only the CompetitionId of this competition instance cannot be determined by the user. CompetitionId should be set to the id of the selected competition that the user is updating. Then, we attach this instance (updatedComp) to the context with its state is set to Modified. When we call db.SaveChanges(), entity framework will locate the competition record based on the CompetitionId of updatedComp and update it with new user input.


protected void btn_Update_Click(object sender, EventArgs e)
{
    using (var db = new FootballDbContext())
    {
        int selectedCompId = Convert.ToInt32(grd_Competitions.SelectedValue.ToString());

        Competition updatedComp = new Competition()
        {
             CompetitionId = selectedCompId,
             CompetitionName = txt_NewCompetitionName.Text,
             Year = Convert.ToInt32(txt_NewYear.Text),
             IsInternational = chk_NewIsInternational.Checked
        };

        db.Entry(updatedComp).State = System.Data.Entity.EntityState.Modified;

        db.SaveChanges();

     }

     BindCompetitions();
}

Delete Competition with Connected Approach

With connected approach, we need to first fetch the competition record that we want to delete and map this record to a competition instance. Then, we used the Remove() method of the Competitions dbset collection (in dbcontext class) to remove the competition instance.

protected void btn_Delete_Click(object sender, EventArgs e)
{
    using (var db = new FootballDbContext())
    {
        int selectedCompId = Convert.ToInt32(grd_Competitions.SelectedValue.ToString());
       
        Competition myComp = db.Competitions.Single(c => c.CompetitionId == selectedCompId);
        db.Competitions.Remove(myComp);

        db.SaveChanges();
    };

    BindCompetitions();

    pnl_ActionSet.Visible = false;
}

Although this approach is simple to implement, it uses server memory inefficiently because it requires to load the entire competition instance to the memory although we did not use the values of its properties (e.g., competition name or year).

Delete Competition with Disconnected Approach

With Disconnected approach, we create a new instance of Competition with its id set to the key value of the selected competition. Then, we attach this instance (compToDelete) to the context with its state set to Deleted. When we call db.SaveChanges(), entity framework will locate the competition record based on the CompetitionId of compToDelete and delete it from the Competitions table.

protected void btn_Delete_Click(object sender, EventArgs e)
{
    using (var db = new FootballDbContext())
    {
        int selectedCompId = Convert.ToInt32(grd_Competitions.SelectedValue.ToString());

        Competition compToDelete = new Competition()
        {
             CompetitionId = selectedCompId
        };

        db.Entry(compToDelete).State = EntityState.Deleted;
        db.SaveChanges();
    };

    BindCompetitions();

    pnl_ActionSet.Visible = false;
}