This post builds on top of the previous post and uses the same domain model (League, Team, Player). In this tutorial, we will build web forms to manage Leagues, Teams, and Players.
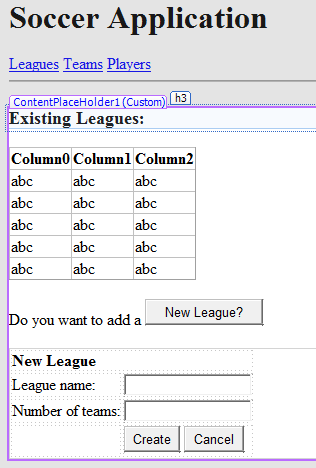
The first page will be ManageLeagues.aspx page, and it will look like this:
Please note that the form for creating a new league is placed inside a Panel control whose Visibility is set to false. When user clicks on New League button, the form for creating a league should be displayed.
GridView Data Control
GridView is a data control that displays data (provided in the data source) in a table format (rows and columns). It is a common practice to use a collection type (e.g., Array, Lists) as the data source of a GridView.
GridView is located in the Toolbox under Data category. You can drag and drop it to the form to use just like other ASP.NET Controls. Below is the ASP.NET tag for creating a GridView using html markup:
<asp:GridView ID="GridView1" runat="server">
</asp:GridView>
You can display any collection-type data (in a tabular format) by using GridView, for each collection item, GridView will create a new row. For the collections of simple data type (e.g., int or string), GridView will create a one column table, and it will generate a row for displaying the value of each item in the collection; if there are 10 items in the collection, then there will be 10 rows generated by GridView. Let’s try to display a string array with GridView:
string[] fruits = { "apple", "melon", "mango"};

GridView1.DataSource = fruits;
GridView1.DataBind();
Here is the outputt:
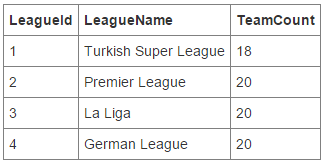
GridView can also help display collections of class objects. When displaying class objects, GridView will read the properties of the class type, and will create one column per each property of the class type. For example, below we will display the existing league records by using GridView. Since the League Type has 3 properties (LeagueId, LeagueName, and TeamCount), GridView will generate a table with three Columns, each of which references to one property of League Class. The columns headings will be copied from the property names; therefore, the column headings will be LeagueId, LeagueName, and TeamCount). Each row will points to one League instance and the property values of the League instance will be displayed in the corresponding column.
In the code below, we defined a method, BindLeagues(), which retrieves the existing leagues with the help of dbcontext class (with db instance in n the code) and bind these leagues to the gridvew:
protected void Page_Load(object sender, EventArgs e)
{
    if (!Page.IsPostBack)
    {
         BindLeagues();
    }
}

public void BindLeagues()
{
    using (var db = new SoccerDbContext())
    {
        grd_Leagues.DataSource = db.Leagues.ToList();
        grd_Leagues.DataBind();
    }
}
Here is how the leagues will be displayed in the gridview:
In summary. the properties of League class are used to build the columns of the table, where each row represents a single instance of League (retrieved from the database with Entity Framework) with its values per corresponding column.
Note that when creating a new League record above, we used Using statement. With Using statement, the context variable, db, is automatically disposed after the Using block. This is important because the more you use Context, the bigger it will get, consuming too much memory in the server. This happens because context instance holds a reference to all the Entities that you have queried, added or attached. Thus, it is a good practice to initiate a new instance of dbcontext each time we needed with Using statement, which has very light overhead.
protected void btn_CreateLeague_Click(object sender, EventArgs e)
{
    League myLeague = new League()
    {
       LeagueName = txt_LeagueName.Text,
       TeamCount = Convert.ToInt32(txt_TeamCount.Text)
    };

    using (var db = new SoccerDbContext())
    {
       db.Leagues.Add(myLeague);
       db.SaveChanges();
    }
    ResetForm();
    BindLeagues();
}
The rest of the code (displaying the form for creating new league, and clearing the form) is below:
protected void lbtn_ShowForm_Click(object sender, EventArgs e)
{
     pnl_NewLeagueForm.Visible = true;
}
protected void btn_Cancel_Click(object sender, EventArgs e)
{
     ResetForm();
}

public void ResetForm()
{
     pnl_NewLeagueForm.Visible = false;
     txt_LeagueName.Text = "";
     txt_TeamCount.Text = "";
}
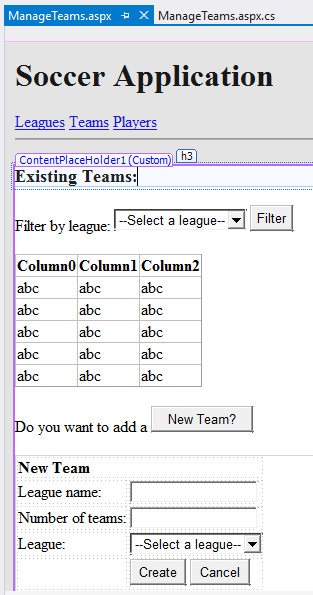
Let’s create the ManageTeams.aspx page. Here is how the page design should look:
Please note that in the form above there are two drop down lists for listing the existing leagues: one is to filter the teams, and the other one to choose the league when creating a new team. The rest of the interface is very similar to the interface of the ManageLeagues.aspx page.
Let’s first bind the existing leagues to the dropdown list which will help us filter teams by the chosen league:
protected void Page_Load(object sender, EventArgs e)
{
    if (!IsPostBack)
    {
        BindLeagues();
        BindTeams();
    }
}

public void BindLeagues()
{
    using (var db = new SoccerDbContext())
    {
        List<League> leagues = db.Leagues.ToList();
        drp_Leagues1.DataSource = leagues;
        drp_Leagues1.DataBind();

        drp_Leagues2.DataSource = leagues;
        drp_Leagues2.DataBind();
    }
}
Please note that we bind the leagues to drp_Leagues2 as well. drp_Leagues2 is included in the form for creating a new team, and will let us choose the league of the new team.
List<T> vs IEnumerable<T> vs IQueryable<T>
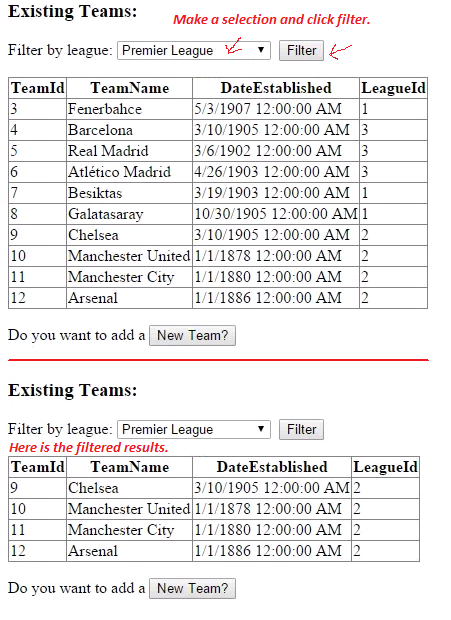
Here is the BindTeams() method that will bind the existing teams. If no league is selected from the dropdown list then all teams will be displayed, if a league is selected, only the teams of the chosen league will be displayed, others will be filtered out.
public void BindTeams()
{
    using (var db = new SoccerDbContext())
    {
         List<Team> teams = db.Teams.ToList();
         if (drp_Leagues.SelectedIndex > 0)//if any league is selected then filter below
         {
             int leagueId = Conver.ToInt32(drpLeagues1.SelectedValue);
             teams = teams.Where(t => t.LeagueId == leagueId).toList();
         }
         grd_Teams.DataSource = teams;
         grd_Teams.DataBind();
    }
}
The above code first fetches all team records from the database – db.Teams.ToList() – and store them in the server memory. Then, the code checks if a league is chosen for filtering, if so, it applies a filter on the teams, and stores the filtered result in the server memory. This approach might have performance penalties since it fetches all the records from the database although we may need teams of a specific league.
What if we use IEnumerable<T>:
public void BindTeams()
{
    using (var db = new SoccerDbContext())
    {
         IEnumerable<Team> teams = db.Teams;
         if (drp_Leagues.SelectedIndex > 0)
         {
              var leagueId = Convert.ToInt32(drp_Leagues1.SelectedValue);
              teams = teams.Where(t => t.LeagueId == leagueId);
         }
         grd_Teams.DataSource = teams.ToList();
         grd_Teams.DataBind();
    }
}
With IEnumerable what happens is that the results from the database are fetched into the memory when the results are explicitly requested by calling teams.ToList(), which is also called deferred execution. That is, the IEnumerable will not execute the query and load anything into the memory until its contents are (enumerated) accessed by the user.
However, IEnumerable does not allow refining the query; it executes only the original query in the database, store all records in the memory, and does the second filtering in the memory, not in the database.
Let’s test our code. Let’s see what SQL query runs on the database when I filter the teams by a league:
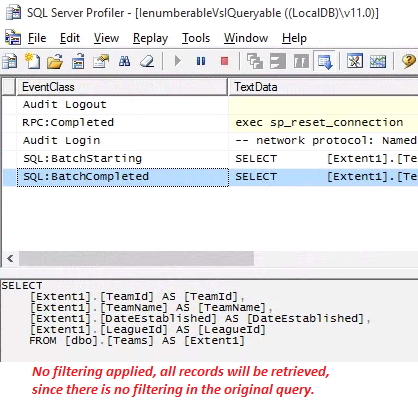
By using SQL Server Profiler, we can keep track of the queries executed on the server. Here is the details of the query executed when I want to filter the teams based on the selected league:
As you see, the select query has no Where clause, which means no filtering is performed on the database-side. This is because our original query with IEnumerable is db.Teams, with no filtering statement (i.e. Where). The all team records in the database are loaded to the memory, then a filtering is applied in the server, when the following line is executed:
teams.Where(t => t.LeagueId == leagueId);
Let’s try IQueryable for a better performance. With IQueryable, not only we can defer the execution of the query but also we can refine our query on the database-side before loading anything into the server memory. Here is the updated code:
IQueryable<Team> teams = db.Teams;
if (drp_Leagues.SelectedIndex > 0)
{
    var leagueId = Convert.ToInt32(drp_Leagues.SelectedValue);
    teams = teams.Where(t => t.LeagueId == leagueId);
}

grd_Teams.DataSource = teams.ToList();
grd_Teams.DataBind();
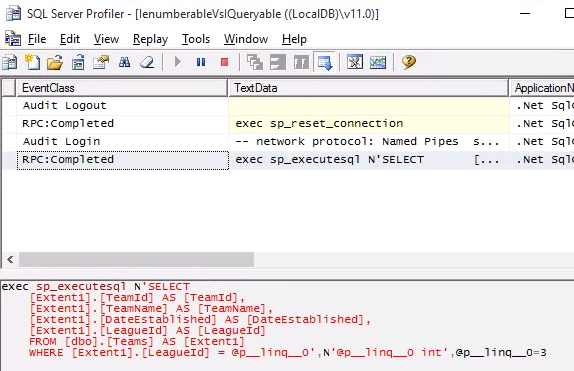
Let’s do the same test, and filter some teams by the selected league. Here is the query that is executed in the server side:
As you see above, the sql query includes a Where clause. That is, IQueryable does filter the records in the database, and loads only the teams of the selected team to the database.
For example, when you are implementing Paging for your records, it is better to use Take and Skip on IQueryable. This way, you will load only the requested records. If you use IEnumerable, with paging you may not have much performance improvement, since it will still load ALL records to the memory, then do the filtering.
Let’s move on. Below is the code to create a new team:
protected void btn_CreateTeam_Click(object sender, EventArgs e)
{
    Team myTeam = new Team()
    {
        TeamName = txt_TeamName.Text,
        DateEstablished = DateTime.Parse(txt_TeamCount.Text),
        LeagueId = Conver.ToInt32(drp_Leagues2.SelectedValue)
    };

    using (var db = new FootballDbContext())
    {
        db.Teams.Add(myTeam);
        db.SaveChanges();
    }

    ResetForm();
    BindTeams();
}
The rest of the code (displaying the form for creating new league, and clearing the form) is below:
protected void btn_Cancel_Click(object sender, EventArgs e)
{
    ResetForm();
}

protected void lbtn_ShowForm_Click(object sender, EventArgs e)
{
    pnl_NewTeamForm.Visible = false;
}

public void ResetForm()
{
    pnl_NewTeamForm.Visible = false;
    txt_TeamName.Text = "";
    txt_DateEstablished.Text = "";
    drp_Leagues2.SelectedIndex = 0;
}
Deleting Records
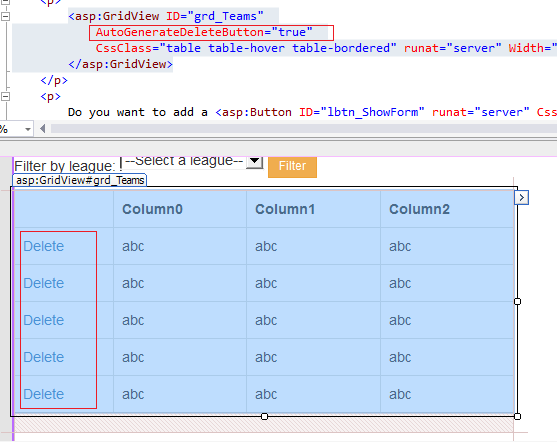
Now let’s implement the delete option. For this purpose, we will benefit from some features of gridview control. First, we can use the built-in delete button of a gridview. We can enable it by using AutoGenerateDeleteButton property:
Once you set AutoGenerateDeleteButton property to “true” you will see that a Delete button is added to each row in the design view.
Now, we need the functionality of these delete buttons. First, once a Delete button is clicked, we need to access the primary key value of the that row (i.e., the Team entity). This way, we can use the primary key value to identify and delete the selected Team entity. We will use DataKeyNames attribute for this purpose, which is logically equivalent to DataValueField in list controls.
As the DataKeyName we always choose the primary key of the entity, which is TeamId in our case:
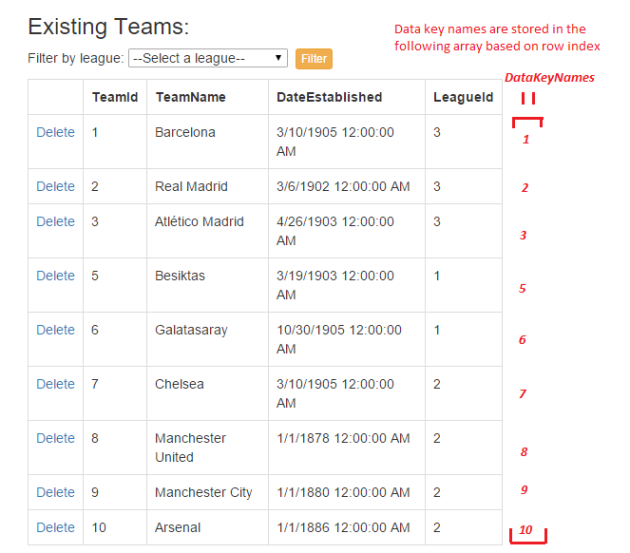
Now, for each row the primary key value, TeamId, will be stored in the backhand, and when a user clicks Delete button on a specific row, we will be able to retrieve the associated TeamId value.
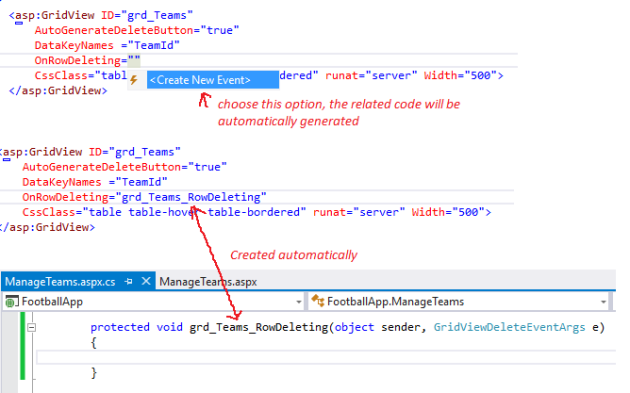
Now we need to implement the click event handler for the delete buttons. Since delete buttons are inside a gridview row, we need to create OnRowDeleting event handlers:
A single handler is created for all delete buttons. You may notice that it has a parameter called GridViewDeleteEventArgs. This parameter will provide the details of the click event and this way we can differentiate on which row the delete button was clicked.
Let’s write our code for this event:
protected void grd_Teams_RowDeleting(object sender, GridViewDeleteEventArgs e)
{
    int selectedTeamId = Convert.ToInt32(grd_Teams.DataKeys[e.RowIndex].Value);
    using (var db = new FootballDbContext())
    {
        var selectedTeam = db.Teams.Single(t => t.TeamId == selectedTeamId);
        db.Teams.Remove(selectedTeam);

        db.SaveChanges();
    }

    BindTeams();
}
In the code above, we retrieved the data key of the selected row (the row where the delete button is clicked) from the DataKeys array of the gridview. In this array, the data key names are stored based on the row index. So, if we know the index of the row where the delete event is triggered, then we can locate the needed data key name (or TeamId) in the DataKeyNames array. At this point, the GridViewDeleteEventArgs is our lifesaver: it can tell us the row index raising the click event by e. RowIndex.
However, the approach we just used for deleting a Team entity is not the best we can do in terms of performance wise. The problem with this approach that knowing LeagueId is not enough to delete the league record in the database; to be able to delete the league record first we need to fetch the whole League instance, and then use it as the parameter in db.Teams.Remove() method. I have to fetch the whole League instance from the database because Remove() method of DbSet only accept the entity itself that is to be deleted. Therefore, we connected to database twice.
There is also another approach for the delete operation, which is called Disconnected approach, and it is more efficient since it does not require an additional database connection. Below is our new code with Disconnected approch:
using (var db = new FootballDbContext())
{
    Team teamToDelete = new Team { TeamId = selectedTeamId };
    db.Entry(teamToDelete).State = System.Data.Entity.EntityState.Deleted;
    db.SaveChanges();
}
In the code below, we created a new instance of Team (teamToDelete) with TeamId property set to the teamid key value of the row where the click event took place. This instance has nothing to do with the database. Then, by using the Entry() method of our DbContext class we change the state of teamToDelete to Deleted. This help us attach this instance to the DbContext and mark it as Deleted; in other words, when db.SaveChanges() method is called, Entity Framework will know that there is a Team instance (with the specified TeamId) that needs to be deleted, and will perform the delete operation.
This Disconnected approach should be preferred over the former approach in which the whole Team instance was fetched to the memory. This will help improve the performance by using server memory more efficiently and causing less numbers of database connection.


Pingback: Configuring One-To-Many Relationships with Fluent API | Asp.Net and Entity Framework
Pingback: Many-to-Many Relationships with Additional Fields | Asp.Net and Entity Framework