This tutorial covers Entity Framework with Code First development workflow. If you want to know about the other development workflows supported by Entity Framework, please click the following link: https://msdn.microsoft.com/en-us/data/jj590134.aspx
Entity Framework (Code First) is basically a data-access technology that performs automatic mapping of your model (created in let’s say Visual Studio through set of classes) into a relational database. In other words, you, kind of, design the underlying database for your project implicitly while working on the class structure for your project, which is referred to as the (domain) model of your project.
Domain Model
A model refers to the collection of the classes and the relationships among these classes. In Domain-Driven Design approach, it is the core of your application development. Poor models will result in applications that are hard to maintain and change. Whatever your model is (poor or great one), the entity framework is responsible for converting your model (i.e., mapping) into a relational database. So, the basic premise of Entity Framework is that the programmers do not need to directly interact with the database (create database and tables, define relationships, etc.), instead they just need to work on the application side and write the necessary code to build the domain model as per the application requirements.
Let’s image that we are building a Book Store application. Probably, in such an application, the model will have classes like Book, Author, Publisher, etc. To keep it simple, let’s create Book class, by using the following declaration:
public class Book
{
    public int BookId { get; set; }

    public string BookTitle { get; set; }

    public int Year { get; set; }

    public DateTime Date { get; set; }
}
Our (very) simple model is ready. Now, it is time to let Entity Framework map our model (composed of only Book class) to a relational database. As you may expect, the resultant database will have a single table, called Book, with four columns (corresponding to each of the properties in Book class).
Installing and Configuring Entity Framework
To be able to use Entity Framework, we need to install it and then enable it with several configurations.
We will install Entity Framework by using NuGet Packages, which is defined as “a Visual Studio extension that makes it easy to add, remove, and update libraries and tools in Visual Studio projects that use the .NET Framework.” (https://www.nuget.org/)
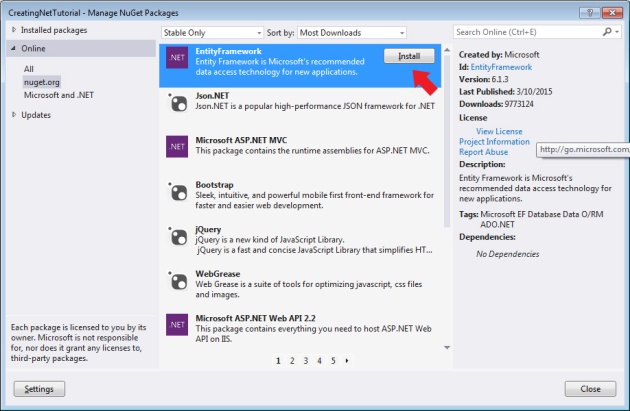
Please right-click on your application in the Solution Explorer, and choose Manage NuGet Packages as seen in the following figure.

In the NuGet Package Manager window, locate EntityFramework in the list, and click Install.
After the installation is completed successfully, you will see a green confirmation mark.
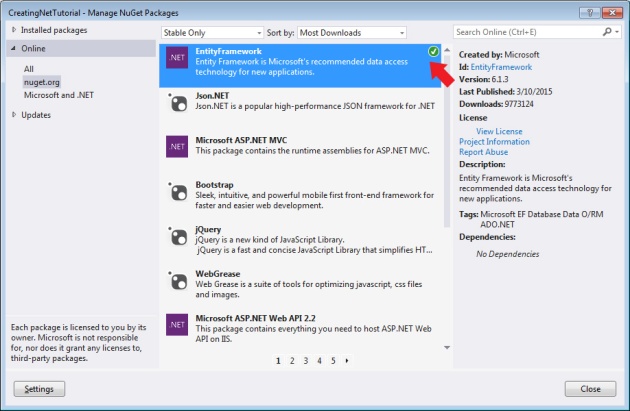
Now, EntityFramework is installed in your application. If you check the References section in the solution explorer you will see new two class libraries are added: EntityFramework.dll and EntityFrameworkSqlServer.dll.
DbContext
To be able to use it, you will need to enable it. To do that, you need to add a new class that inherits from DbContext class (which is defined in EntityFramework.dll). DbContext is the class by which you can explain your model to Entity Framework, which in turn can map your model to a relational database. DbContext is the core class which has the logic that drives Entity Framework Code First.
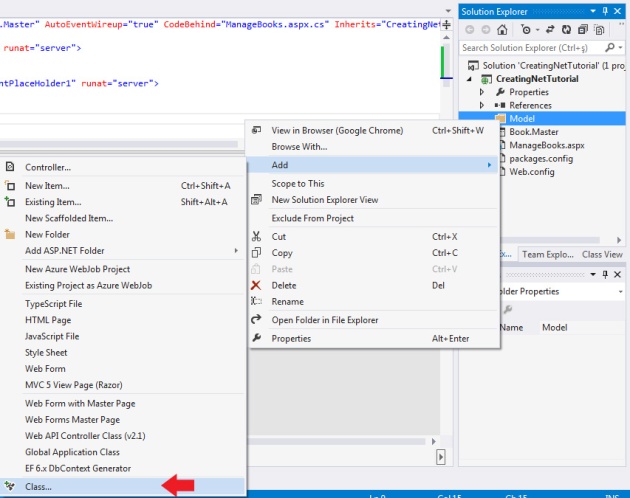
Let’s create a new folder named Model, and inside this folder please create a class as shown in the figure:
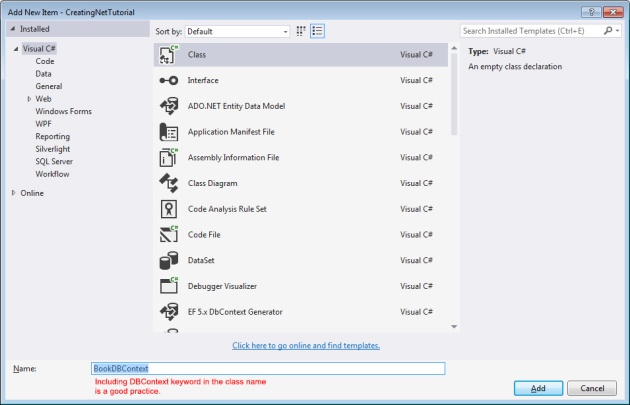
Please give a proper name to the class (by convention your class name should have DbContext suffix):
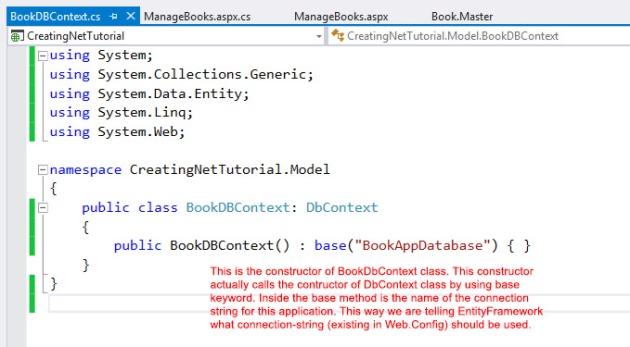
The BookDbContext class need to inherit from DbContext. When inherited from DbContext, the BookDbContext class will be able to access all methods of DbContext and will help interact with the database from our web application.
The following image illustrates the BookDbContext class. Please pay attention to the explanation in the image:
Connection Strings in Entity Framework
After we define the constructor for BookDbContext class, as illustrated above, you will need to add a connection string to Web.Config. A connection string is what your ASP.NET application needs for establishing a connection to an existing (or to-be-created) database. Connection strings in general is composed of username, password, and path to the database file (or server). The connection strings are added in Web.Config file.
You can define more than one connection strings, each of which should have a unique name. You tell Entity Framework about the database with the help of the connection string. You just need to provide the name of the connection string, then Entity Framework will find and read the entire connection string defined in the Web.Config file. The name of the connection string should match the string typed in base() method. In this example, it is BookAppDatabase. Here is an example connection-string in Web.Config file:
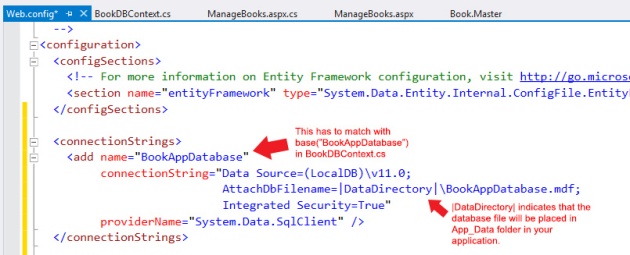
Here it is in text format:
<connectionStrings>
<add name="BookAppDatabase" connectionString="Data Source=(LocalDB)\v11.0; AttachDbFilename=|DataDirectory|\BookAppDatabase.mdf; Integrated Security=True" providerName="System.Data.SqlClient" />
</connectionStrings>
In the connection string above, we used |DataDirectory| when indicating the path for the database file. |DataDirectory| points to an ASP.NET folder, called the App_Data.
If your connection string contains |DataDirectory| then you have to have App_Data in your application. You can add this folder to your project by right-clicking on your project in the solution explorer, then Add -> Add ASP.NET Folder -> App_Data :

DbSet
A DbContext corresponds to whole database. In this database, we need tables, right? For example, in our scenario we will need a table for recording instances of Book class. We can indicate the tables that we want in our database in DbContext class by using DbSet type. In other words, we need to use DbSet type to ask Entity Framework consider Book entity when it maps the domain model to the database. Otherwise, Entity Framework will not think that it should map Book class in mapping.
public DbSet<Book> Books { get; set; }
Here is the updated BookDbContext.cs:
public class BookDbContext : DbContext
{
     public BookDbContext() : base("BookDbConnection") { }

     public DbSet<Book> Books { get; set; }
}
The Books object with DbSet type will also act as a proxy to the Books table in the database when we need to read some book records, or when we need to create, update or delete a book entry.
Testing
Now, we are ready to test our application. For testing, we will add a new Web Form to our application, and insert the following code in Page_Load event:
protected void Page_Load(object sender, EventArgs e)
{
   Book myBook = new Book()
   {
       BookTitle = "Harry Potter",
       Date = DateTime.Now,
       Year = 2005
   };

   BookDbContext db = new BookDbContext();
   db.Books.Add(myBook);

   db.SaveChanges();
}
Please run your application, you should see an empty page with no error thrown. Then, you can return back to the Visual Study (please stop debugging if needed). Now, in the Server Explorer window, you should be able to see the database that is just created. If you cannot please try to close and reopen the Visual Studio.

You may notice that we did not set a value for the BookId of the new book instance we just created. However, Entity Framework took care of the problem and automatically generated a BookId value. This BookId column is also the primary key in our table, how come Entity Framework was able to infer this? We will cover this in the next tutorial.
Summary
Here is the summary how you should enable Entity Framework in your application:
- Complete your model (create the classes, etc. as needed) -place classes in Model folder,
- Install Entity Framework using NuGet Package Manager,
- Create your application’s DbContext file (e.g., BookDbContext) that inherits from DbContext class,
- Choose a name for the connection string and put it in the constructor of your DbContext file,
- With the name used in the previous step, create a connection string in the Web.Config file,
- Add App_Data folder to your application (assuming that you used |DataDirectory| in the connection string)

Pingback: Implementation of 1-To-Many Relationships in Entity Framework | Web Applications with Asp.Net Entity Framework
Pingback: Code First Conventions and Configurations in Entity Framework Code First | Asp.Net and Entity Framework