As briefly covered in the previous blog post (click here to read), Code First approach embraces Domain-Driven Design (click to read more). That is, if you are using Code First approach, you are expected to first build your domain model as per your application needs: you need to determine
- What entities (classes) need to be created,
- What properties that these entities should have, and
- What relationships should be set among these entities (1:1, 1:M, and M:M).
When building your model, you need to follow Code First conventions and configurations so that Entity Framework can read, interpret your model, and map it to a database accordingly. In other words, with these conventions and configurations, Entity Framework can extract the needed information from your model to build the corresponding database correctly.
Let’s create a class, called Product, to see how to apply these conventions and configurations.
Conventions for Primary Key, Table, Column Names
Code First requires that all classes in your model have a key property, and Code First provides the convention that if there is a property named Id, or the type name (i.e., class name) combined with Id is considered the primary key. If you do not follow this convention you will receive an error, and your database will not be created (or updated). For example, the Product class can have a key property named either Id or ProductId (not case-sensitive). The key property will be mapped to Primary Key field in the database.
public class Product
{
     public int ProductId { get; set; }//or it could be Id

     public string ProductName { get; set; }

     public decimal Price { get; set; }

     public bool IsAvailable { get; set; }
}
It is also important that the Key property is Int type. In this way, Code First will create an system-generated integer-type Primary Key in the database, starting with value (seed) 1, and incremented by 1 with each new record in the table.
The table name convention in Code First is that by default the class name will be pluralized and used as the corresponding table. For the Product class, the table name will be Products in the database. Code First uses the rules of English language in the pluralization.
Code First creates the columns in the tables by directly using the names of the properties in the corresponding Entity (i.e., Class).
Please follow these steps to to install and enable Entity Framework in the application:
- Complete your model (create the classes, etc. as needed) -place classes in Model folder,
- Install Entity Framework using NuGet Package Manager,
- Create your application’s DbContext file (e.g., ProductDbContext) that inherits from DbContext class,
- Choose a name for the connection string and put it in the constructor of your DbContext file,
- With the name used in the previous step, create a connection string in the Web.Config file,
- Add App_Data folder to your application (assuming that you used |DataDirectory| in the connection string)
Using Code First Migrations to Create/Update Database
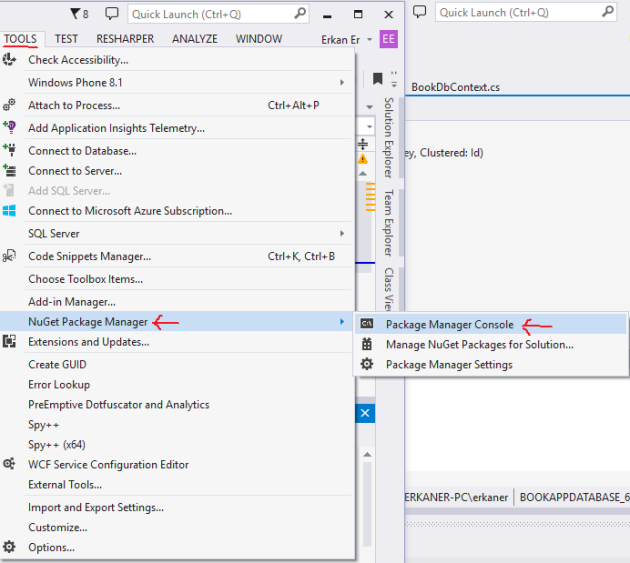
Now, we will use Migrations to build the database. Migrations is an entity framework feature that help you the deploy any changes in your model to the database. It does this by updating the database schema without having to drop and re-create the database. Here, we will use it to initialize our database. We use the Migrations feature through the Package Manager Console : TOOLS -> NuGet Package Manager -> Package Manager Console.
You should see the following window at the bottom of the VS:
Package Manager Console works like a Command Line application of Windows. Basically, you execute some commands here. First, we will need to enable migrations in your dbcontext file (indicated with -contexttype attribute):
PM> enable-migrations -contexttype ProductDbContext
This will enable migrations in your application. Next step is to add a migration instance by running the following code. You need to give a descriptive name to the migration instance:
PM> add-migration firstDbCreate
After you run these two commands, your Package Manager Console should look like this:
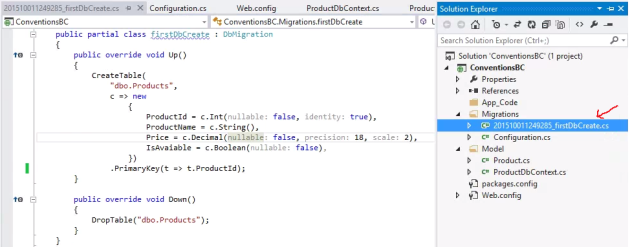
And, you should have a Migrations folder created in your application, with two files: Configuration.cs, and SomeNumber_firstDbCreate.cs (the new migration instance). Please open the _firstDbCreate.cs file:
In the migrations file, you will see the changes that will take place under Up() method. You will see that CreateTable() method is used to create one table in the database (corresponding to Product entity) with four Columns (corresponding to each property of Product entity). Here are the highlights on the database conversion:
- Every Column will be not-nullable except ProductName,
- Price, which is decimal type, will have precision set to 18 (number of digits) and scale set to 2 (number of digits after the decimal point),
- ProductId has Identity set to true, which means it will use the Identity(seed, increment) function,
- ProductId is set as the primary key of the table.
We have created migration but did not use it yet. We need to deploy this migration to our database by using the following command in Package Manager Console:
PM> update-database
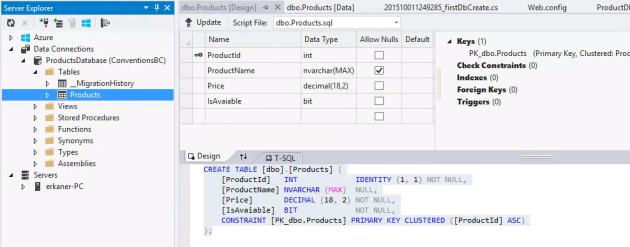
Now it is time to check the Server Explorer (View -> Server Explorer). If you cannot see it, please just close your project (not VS) and reopen it quickly from File -> Recent Projects and Solutions menu, which will refresh Data Connections successfully. Here is what you should see:
Data Annotations for Primary Key, Table, Column Names
We do not have to follow the default conventions in Code First. We can override these default conventions by using Data Annotations. Data Annotations are applied to Classes and properties directly and help do some configurations as needed.
Data Annotations exists in System.ComponentModel.DataAnnotations namespace.
Let’s use Data Annotations in the Product class to (1) change the default table name (by using Table annotation), (2) define a different key property (by using Key annotation), and (3) change the column name in the table for ProductName property (by using Column annotation).
[Table("ProductItems")]
public class Product
{
     [Key]
     public int ItemId { get; set; }

     [Column("Name")]
     public string ProductName { get; set; }

     public decimal Price { get; set; }

     public bool IsAvailable {get; set; }
}
After any single change on your model, Entity Framework will require a database update by using Migrations, otherwise you will receive this error:
"The model backing the 'DataContext' context has changed
since the database was created.
Consider using Code First Migrations to update the database".
What you need to do is add a new migration:
PM> add-migration changes1
Then, you need to deploy the new migration by executing update-database command.
Conventions for String, Bool, and Integer Type
- The default column data type for String properties is nvarchar(max). Nvarchar data type allows storing unicode variables (e.g., Chinese, Korean characters). By default String properties are nullable.
- The default column data type for Bool properties is Bit, with default value of False (or 0). By default Bool properties are not nullable.
- The default column data type for Integer (or decimal) is int (or decimal). By default Int (or decimal) properties are not nullable.
We can override these conventions and configure our Model to allow nullable int and bool properties, to define a length on the String property, and also to set a upper and lower limit for the numeric properties.
public class Product
{
    public int ProductId { get; set; }

    [MinLength(5)]
    [MaxLength(50)]
    public string ProductName { get; set; }

    [Range(0, 50)]
    public decimal? Price { get; set; }

    public bool? IsAvaiable { get; set; }
}
In the code above, we did several configurations:
- ProductName cannot be shorter than 5 characters, and longer than 50 characters long.
- Price cannot be more than 50,
- bool? makes IsAvailable nullable
Let’s add a new migration to apply these changes:
PM> add-migration propertyChange
You should see the following migration file:
public override void Up()
{
    AlterColumn("dbo.Products", "ProductName", c => c.String(maxLength: 50));
    AlterColumn("dbo.Products", "Price", c => c.Decimal(precision: 18, scale: 2));
    AlterColumn("dbo.Products", "IsAvaiable", c => c.Boolean());
}
As you may notice, “nullable: false” statements are omitted in property definitions above.
Also, we have “maxLength: 50” in the declaration of ProductName definition. However we do not have any specific statement in the definition of Price to set its Range between 0 and 50. This is because there is no SQL feature to define this constraint. However, this will be validated by Entity Framework, that is, if you attempt to add a price higher than 50, the entity framework will throw a validation error even before it interacts with the database.
Before we run update-database command to deploy the changes, let’s learn how we can provide some initial data to our database, in other words how can we seed our database with some test data.
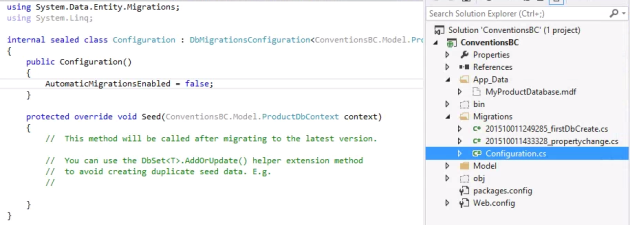
Under the Migrations folder, there is file called Configurations.cs, please open it:
There is a Seed method in this class, this is where we will ask Entity Framework to generate some data for our application. Please add the following code to Seed() method:
protected override void Seed(ConventionsBC.Model.ProductDbContext context)
{
    // This method will be called after migrating to the latest version.

    // You can use the DbSet<T>.AddOrUpdate() helper extension method
    // to avoid creating duplicate seed data. E.g.

    context.Products.AddOrUpdate(
        p => p.ProductName,
        new Product() { Price = 25, ProductName = "Item1" },
        new Product() { Price = 10, ProductName = "Item2" }
    );
}
This Seed method will be invoked just after the database is created or updated. Here, it is better to use AddOrUpdate method to prevent duplication in your dataset. The first parameter of AddOrUpdate is the identifier property, which is set as p.ProductName in our case. That means AddOrUpdate method will check the existing records to see if there a row with the matching ProductName, if so, update this row with the new information, otherwise, create a new row.
Now you can update the database:
PM> update-database
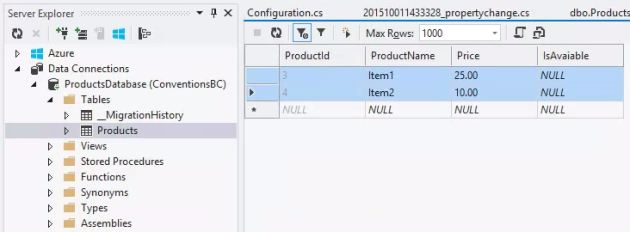
Please check the database from the Server Explorer:
This tutorial ends here. Here is the list of topics covered in this tutorial:
- Code First default conventions,
- Data annotations for properties,
- Code First migrations.
