This tutorial introduces the Visual Studio (VS) for web developers. The tutorial covers the major components and features of VS that you will often use when developing your applications. I will use Community 2013 version of Visual Studio. If you are using a different version of Visual Studio (after 2o12) you do not need to worry. You will be still able to follow this tutorial easily. There will be only minor differences that you can easily figure out yourself. If you cannot, you are always welcome to post your questions.
Visual Studio is actually a very large program, and maybe it is one of the largest application with its over ~50 millions lines of code. Check this link if you want to see the comparison of popular applications in terms of the number of lines of codes.
Creating an Empty Web Application in VS
We will start this tutorial by creating a new web application. The applications that you create in Visual Studio will be based on a structure called Solution. Solutions are overarching components, and they can contain one or more projects. When you create a new project, a default Solution will be automatically created for you and the project being created will be included within that solution by default.
To create a new empty web application, we need to click on the FILE located at the far left of the menu bar. Then, a drop down menu will appear. From that menu, we need to choose New, and then from the sub menu, we need to click on “Project…” item. Please see the following figure for the illustration if you are having any trouble locating the menu items.
TIP: Alternatively, in order to create a new project, you could simply click “New Project..” button located at the left hand-side of the Starting page of the Visual Studio.
You may notice that when viewing the menu items VS shows some key combinations next to some menu items. These are actually the keyboard shortcuts to these menu items. For example, we could use Ctrl+Shift+N key combination to quickly bring the New Project dialog window. I strongly recommend you to learn the shortcuts for the operations or functions that you frequently use in VS. I personally use shortcuts often, and they definitely help increase my productivity .

As you may notice, there was three dots next to Project menu item (Project…), which actually tells us that we should expect a dialog box next. You should see the New Project dialog box as shown below. In this dialog, you will see many project templates. Sometimes locating a specific item from this list is challenging. In general, I use the Search box located on the top-right of the window. We want to create an empty web application. So, it makes sense to put the empty keyword in the search box. You will see that the number of items listed will substantially decrease.
After the search, at the top of the list, you may see two very similar items. There seems to be a duplicate entry for ASP.NET Empty Web Application as seen in the following image. Actually, if you pay close attention, you will notice that they are NOT identical: one is for Visual Basic and one is for Visual C#. We will choose the Visual C# one.

Then, please type LearningVS as the name of your project. You will notice that as you are typing the project name, the Solution name is dynamically changed to the project name being typed. This behavior is default. However, you can change the solution name if you would like. We will keep it as it is in our case. Now, you are ready to hit the OK button.
You many notice that while creating a new project, VS studio is automatically creating a solution in which the new project will exist. Please remember that Solution is the overarching component in VS and every project has to be placed in a Solution, and a Solution can contain more than one projects.
Toolbox, Solution Explorer, Server Explorer, and Properties Window
After creating the new project if you see no change in Visual Studio environment like the one shown in the image below, do not panic! Your project is actually successfully created. You may get an empty screen for two possible reasons. The windows within the VS environment can be either hidden or closed. In my case they were hidden since the auto-hide feature for these windows was enabled. In the image below you may see that there are headers (positioned vertically) on the edges of the VS. Each of these headers actually belong to one of the components of VS that are commonly used in application development: Toolbox, Solution Explorer, Server Explorer, and Properties.

I disabled auto-hide for Toolbox, Solution Explorer, Server Explorer, and Properties windows as seen in the image below. You can do this by clicking on the pin button located in the title bar of the intended window (please see the image below). You can also arrange and dock windows based on your preference. You just need to drag and drop the windows by holding from their title bars. When you start dragging a window you will see docking options on the screen. I think that you can better learn how these docking mechanism works by try yourself. Please go ahead and try in your computer positioning these windows. Please check this resource if you’d like to learn more about customizing the layout in VS. Also, note that Toolbox is empty for now since there is no active web page open in the editor. Items (i.e., web controls) in the Toolbox will become available only if there is a web page open in the designer mode.
My Visual Studio has the following layout in general:

Toolbox is where you can find the web controls (such as buttons, labels, and text boxes) that you will need to build the interface of your web pages. Later, we will learn how to add controls from Toolbox to the web pages, and program certain functionalities with the web controls.
Server Explorer is commonly used for database connectivity. If your application has a database connectivity, Server Explorer is where you can access the database and configure it if needed. Server Explorer actually helps access Light SQL Database Management tool that comes with the VS Community Edition. This light version of SQL Database Management tool has limited database management capability, which is still quite enough for small or medium-sized software development.
Properties Window shows the properties of
- Any select item from the Solution Explorer: This can be a page, a class, or any item in the solution explorer. If you select the Solution item, you will see that the properties window displays a set of properties pertaining to the current solution open, such as the Path of the Solution file in the computer.
- Any selected web control in a web page: If you place a web control on a page, and then select the control, you would see that Properties window is updated with a long list of items (e.g., height, width, visibility, text, etc.) that you will use to do certain changes or configurations on the selected web control. Most of the time we use Properties window for the web controls.
Solution Explorer is where you can find the files and resources of your project. Let’s check Solution Explorer window and see what files and resources were created by default for us by Visual Studio (see the image below). The root of your project is the Solution since your project is contained within a solution. Under the solution, you will see the project with “LearningVS” title, and under the project folder you will see the files and resources of your project.
- Properties: This folder includes a file called AssemblyInfo.cs which contains general information about the assembly file (like name, description, version, etc.). An assembly is a collection of types and resources that are built to work together. For example, the classes in your application will be complied into the assembly file (*.dll), and when you deploy your application on the server you will need the assembly file on the server side.
- References: This folder contains the references to existing ASP.NET libraries. Actually, each reference is an Assembly file with *.dll extension, and contains hundreds of classes created by Microsoft (or any other 3rd party library) for us to use. For example, System.Drawing.dll assembly will include classes needed to add some drawing functionality to our application.

- Web.config: This file is the configuration file for our application. For example, with Web.Config, we can configure session timeouts, maximum size for file uploads, database connection strings, access restrictions to certain files and folders, etc.
Adding a New Item to the Project
In order to insert a new item to an existing project, you need to right-click on the project name in the Solution Explorer. Then, in the pop-up menu you need to choose Add.

Next, a new child menu will be displayed when you click on Add. In this menu, you can choose New Item if you want to create a new item, or you can choose Existing Item if you want to import an already existing item to your project.
As shown in the image below, the six items located around the middle section of the menu are the default items predetermined by VS. Under these six items, there will be a list of items generated based on the history of your activities. In other words, the last 5 items (at max.) that you have added to any of your projects will be displayed toward the bottom of the menu, which makes things very convenient for the developers. You may see a different list depending on the files you have previously worked with.
We will add a new Class, please choose the “Class…” item (at the bottom of the menu). This “Class…” item comes default at the bottom of this menu.

Then, you should see the following window where we need to type a name for this new class. Let’s name the class as TestClass. After you type the name, please click “OK” button.

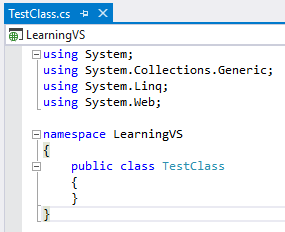
As seen in the image below, the TestClass should be created and opened in the VS editor. When you create a new application, your application will by default has a namespace named with your application’s name, which is LearningVS in our case. Later, when you add a new item to the root of your project, like the way we added TestClass, your class will be declared inside the project namespace. That is why the TestClass class is placed inside the LearningVS namespace.
Line Revision Marks
In order to illustrate some features of the VS, we will add several lines of codes to TestClass. Let’s define an integer variable with an initial value of 100.
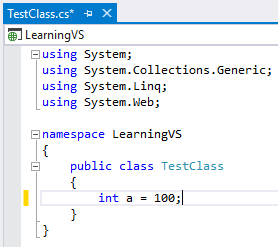
You may notice that a yellow bar appears at the beginning of the code we have just added. This yellow bar indicates that the adjacent code is changed (or added new) after the file is loaded to the editor or after the last time the file was saved.
Please press Ctrl + S to save the changes to TestClass. The yellow bar should turn into a green bar as you can see in the following image:
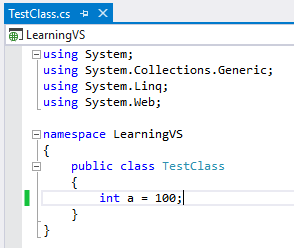
The green bar means that the adjacent code was new or updated, and now it has been successfully saved.
These two types of bars are useful in terms of helping us detecting and keeping track of the changes in our code. You will definitely have a better sense of the current state of your code with these two helpers.
Line Numbers
We can display or hide line numbers in our code. Numbering is not enabled by default in VS. However, we can turn on line numbers. Line numbers are particularly useful when you want to point to a specific line of code when discussing or explaining your code. In order to display the line numbers, normally we need to choose Tools on the menu bar, and then click on Options in the sub menu, which opens the options window where we need to expand the Text Editor, and then select All Languages. Instead of following this long approach, we will use Quick Launch which is located at the top bar of the VS as you can see in the following image.

Then, we will type line numbers in the Quick Launch box, and choose the option listed.

This will bring the Options window with the specific section displayed (All Languages -> General). In the window displayed, please mark the Line numbers check box and then click OK button to save the changes and close the window.

Now, you should see the line numbers adjacent to each line of your code now.

Building the Project
Before we end this tutorial, I want to explain briefly how to build your project. You are encouraged to build your code often, which will help you identify compile-time errors, such as incorrect syntax, earlier before your program gets complicated making handling the errors harder. Also, to run and test your application, you have to build your project to generate the complied files. For build, there are three specific items in the menu that appears when you right click on the Project item in the Solution Explorer: Build, Rebuild, and Clean.
- Build compiles only the code files which were changed, discards the rest. So, it is a partial compilation. That is, if you change something in one class and then build your application, then only the class with the change will be complied whereas other classes will be discarded.
- Rebuild does not care whether there is any change in a specific code files. It just causes the deletion of all existing compiled files and compiles everything fully from scratch.
- Clean just deletes all compiled files, and do nothing else.
Conclusion
This tutorial concludes at this point. We covered the major components and feature of VS that we will use most of the time when developing our web applications. If you want to take a further and deeper look into the features of Visual Studio, here are several useful resources:
- https://msdn.microsoft.com/en-us/library/ms165079(v=vs.120).aspx
- https://www.visualstudio.com/en-us/downloads/download-visual-studio-vs.aspx
- https://msdn.microsoft.com/en-us//library/e2h7fzkw.aspx
In the next tutorial, we will learn how to create ASP.NET Web Forms, add controls to web forms. We will also write a small C# code to achieve a small programming task in the next tutorial.
