ASP.NET has five list-type controls: BulletedList, ListBox, DropDownList, CheckBoxList, and RadioButtonList. These four controls inherits from the same base class, called ListControl.
- System.Web.UI.WebControls.ListControl (Base Class)
- System.Web.UI.WebControls.BulletedList
- System.Web.UI.WebControls.CheckBoxList
- System.Web.UI.WebControls.DropDownList
- System.Web.UI.WebControls.ListBox
- System.Web.UI.WebControls.RadioButtonList
Since they inherit from the same class, these four controls share many properties and methods, such as Clear(), which will clear all existing items in the list, or SelectedItem, which will return the selected list item. This is because the inheriting classes have access to the base class’s properties and methods. All the common properties and methods shared by different list controls are actually declared in ListControl class.
Let’s get familiar with these controls through some examples. Please note that the following examples apply to all of the List Controls with possible slight changes. I will use mainly list control in the following examples.
Adding Items to List Controls
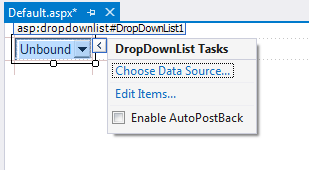
Let’s create a new project, add a new page (i.e., web form) to the project, and insert a DropDownList control to the page. When you select the control you will see a small arrow button on the top-right of the control. When you click on that arrow button, you will see the following small menu:
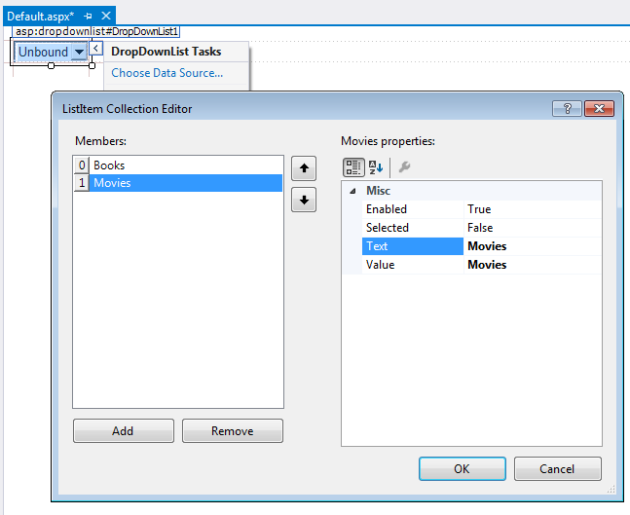
We will choose “Edit Items…” in the menu. Please also note that if you want to enable AutoPostBack for a list control, you can do so using this small menu. Once you click “Edit Items…”, you will see a new window where you can MANUALLY add some items to the list control. Go ahead and add two items as seen in the following figure. The text and value properties of each list item will carry the same value.
After you are done, please click OK button. If you view the html source, you will see the items are added within <asp:DropDownList tag, and defined with “<asp:ListItem” tags. We could also add the items using the html markup.

Manually adding items to a list control is easy. However, if you are building a database-enabled project, a project that is bigger in its scope you will rarely do manual-item adding. This is because you will rarely have static items in your list control. Instead, you will populate the list controls with data coming from the database. For example, let’s assume that this dropdown list is used to display the categories of products in an online store. If this store begins to sell Electronics later, you will not add this new category manually. Instead, there will be a database where Categories are stored in a table, and the new category will be inserted to that table. Later, you will need to bind this Category table to the dropdownlist which will automatically show the new category added. So, let’s learn how to populate list controls programmatically.
Let’s first add a ListBox control to the form, and change its ID to lst_Controls. Then, please switch to the CodeBehind file to write some code to Page_Load event.

To add new items to ListBox, you can create ListItem objects and then add these objects to Items collection of the list control. To do that you can follow four different styles as shown in the following code. All of them exactly do the same thing with slightly different approaches. You can choose the way that you feel more comfortable with. I always prefer the third option. Please see the following snippet for the details:
protected void Page_Load(object sender, EventArgs e)
{
     //USING LISTITEM OBJECT

     //First way
     ListItem item1 = new ListItem("Books", "1");
     lst_Categories.Items.Add(item1);

     //Second way
     ListItem item2 = new ListItem();
     item2.Text = "Movies";
     item2.Value = "2";
     lst_Categories.Items.Add(item2);

     //Third way
     lst_Categories.Items.Add(new ListItem("Electronics", "3"));

     //Fourth way
     lst_Categories.Items.Add("Home");
}
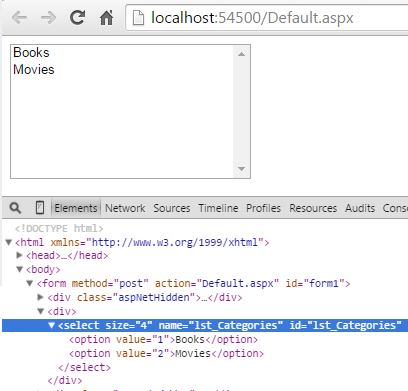
Please run your application and check the html source code of the page. You will see that the ListBox control is rendered as select option in html.
What if we have an array variable and we want to bind this array to our list control? In the following code snippet, we have a string array, called categories, with three items. Then, by using foreach loop we are adding array items to the lst_Categories.
string[] categories = { "Books", "Movies", "Electronic" };

//foreach statement assigns each item to category variable
//starting from the item at index 0
//and do some operation as defined within the foreach code block
//and then move to the item in the next index.
//it continue doing this until the last item in the collection is processed
foreach(string category in categories)
{
    lst_Categories.Items.Add(category);
}
When we have a group variable, like Array or Lists, actually, we can take advantage of BindData() method:
lst_Categories.Items.Add("test");

string[] categories = { "Books", "Movies", "Electronic" };

lst_Categories.DataSource = categories;
lst_Categories.DataBind();
First, we need to indicate the DataSource which is categories array, then we need to call DataBind() method to bind the categories to the list box. DataBind() can be used with arrays, and other collection types such as Lists. Let’s do an example with Lists:
List<string> categories = new List<string>();
categories.Add("Movies");
categories.Add("Books");

lst_Categories.DataSource = categories;
lst_Categories.DataBind();
We have done exactly the same thing, except that we defined a List with string type. A list can hold any type: string, integer, or a complex type (for example we could create a Category class, and store its instances in a List). Lists are also more dynamic compared to arrays: for example you can add or remove items from a List type a lot more easily compared to an array. (Note that there is also ArrayList type in C#, but this tutorial will not cover it. Click here if you want to learn more about it.)
When binding data to list controls, there are two important properties to consider: DataTextField and DataValueField. DataTextField decides what to display in the list control, whereas DataValueField keeps the value associated with the list items. For example, if you have a list of students displayed with a DropDownList, the DataTextField should be set to the student’s name (what you see), and DataValueField should be set to the ID of the student. You will always want to associate a unique property to DataValueField because this is the property that will help you perform further operations on a specific student. For example, if you want to remove a student record from the database, you will need the ID of that student not its name since there might be many students with the same name.
To see how DataValueField and DataTextField properties work let’s create a new class:
public class Category
{
     public int CategoryId { get; set; }

     public string CategoryName { get; set; }
}
Let’s create two Category instances and bind them to ListBox through a List variable:
List<Category> categories = new List<Category>();

Category cat1 = new Category();
cat1.CategoryId = 1;
cat1.CategoryName = "Books";
categories.Add(cat1);

Category cat2 = new Category();
cat2.CategoryId = 2;
cat2.CategoryName = "Movies";
categories.Add(cat2);

lst_Categories.DataSource = categories;
lst_Categories.DataValueField = "CategoryId";
//this has to match the CategoryId property of the Category class
lst_Categories.DataTextField = "CategoryName"
//this has to match the CategoryName property of the Category class
lst_Categories.DataBind();
If you run the application you will see the list populated properly, and we have the exactly same output that we had above when we used ListItem object.
Let’s print the selected values from the List Box. First, we need to add a button and a label just under the list box:
Please double-click on the button to insert the click event handler to the CodeBehind file:
protected void Page_Load(object sender, EventArgs e)
{
     Category cat1 = new Category();
     cat1.CategoryId = 1;
     cat1.CategoryName = "Books";
     categories.Add(cat1);

     Category cat2 = new Category();
     cat2.CategoryId = 2;
     cat2.CategoryName = "Movies";
     categories.Add(cat2);

     lst_Categories.DataSource = categories;
     lst_Categories.DataValueField = "CategoryId";
     lst_Categories.DataTextField = "CategoryName";
     lst_Categories.DataBind(); }
}

protected void btn_Show_Click(object sender, EventArgs e)
{

}
Let’s first create a method called BindCategories and move the code snippet (that adds new items to list box) to the BindCategories() method. Then, call BindCategories() method from Page_Load event handler. Let’s define another method called ReturnSelectedItemsText() and call this method from the btn_Show_Click event handler. Your final code should like this:
protected void Page_Load(object sender, EventArgs e)
{
BindCategories();
}
protected void btn_Show_Click(object sender, EventArgs e)
{
lbl_SelectedItems.Text = ReturnSelectedItemsText();
}
protected string ReturnSelectedItemsText()
{
string selectedtext = lst_Categories.SelectedItem.Text
+ &" (" + lst_Categories.SelectedItem.Value + ")";
return selectedtext;
}
protected void BindCategories()
{
List<Category> categories = new List<Category>();
Category cat1 = new Category();
cat1.CategoryId = 1;
cat1.CategoryName = "Books";
categories.Add(cat1);
Category cat2 = new Category();
cat2.CategoryId = 2;
cat2.CategoryName = "Movies";
categories.Add(cat2);
lst_Categories.DataSource = categories;
lst_Categories.DataValueField = "CategoryId";
lst_Categories.DataTextField = "CategoryName";
lst_Categories.DataBind();
}
You may think that this code will run just fine, however it will not. It will throw a NullExceptionReference, because in every postback event we are re-binding the categories to the list box, and clearing the current selection in the list box. To fix this problem, we need to check if Page.IsPostBack true or false before calling BindCategories() method in Page_Load.
protected void Page_Load(object sender, EventArgs e)
{
     if (!Page.IsPostBack)
          BindCategories();
}
Multiple Selection
It is easy to print the selected item when only one item can be selected. Only in List Box, we can enable or disable multiple selection mode. CheckBoxList controls, by default, always allows multiple selections, whereas RadioButtonList and DropDownList work only in single selection mode.
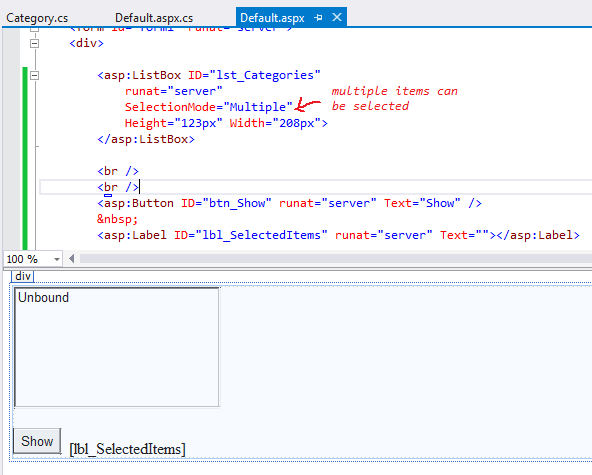
Let’s enable multiple selection mode for our list box. We use the SelectionMode property for this purpose as seen in the following figure:
Now, we need to print the multiple items in the label. For this purpose, we will use foreach loop to iterate through the list items and we will check if the item is selected during each iteration, if so, we will add the item to the label for printing. Here is the updated version of ReturnSelectedItemsText() method:
protected string ReturnSelectedItemsText()
{
     string selectedtext = "";

     foreach (ListItem item in lst_Categories.Items)//iterate through the items
     {
         if (item.Selected)//if selected, then update the output string
         {
              selectedtext += lst_Categories.SelectedItem.Text
                           + " (" + lst_Categories.SelectedItem.Value + ") ";
         }
     }

     return selectedtext;
}
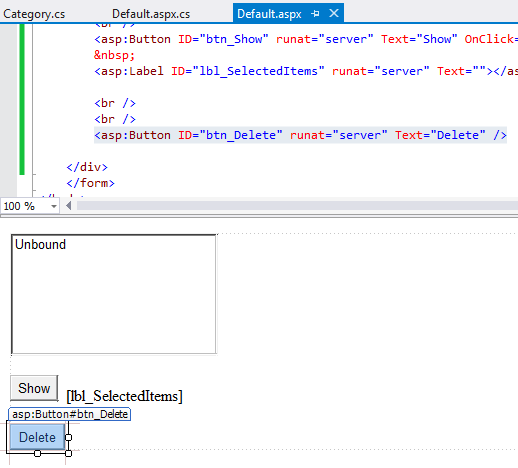
Let’s complete this tutorial with one more small exercise. Let’s add a button that will delete the selected items from the dropdownlist as seen in the following figure:
Let’s write the code for the delete operation:
protected void btn_Delete_Click(object sender, EventArgs e)
{
     foreach (ListItem item in lst_Categories.Items)//iterate through items
     {
          if (item.Selected)//if the current item is selected
          {
               lst_Categories.Items.Remove(item);//remove it
          }
     }
}
Although the logic of the code is perfect, an exception will be thrown. This is because while iterating through the items in the list, we cannot change the list, which will break the loop, and C# will not let you do that. In this case we can use GetSelectedIndices method which will get the array of index values for currently selected items. Then, using foreach loop, we will iterate through this array and remove the items one-by-one based on their index.
protected void btn_Delete_Click(object sender, EventArgs e)
{
      int[] selectedIndices = lst_Categories.GetSelectedIndices();// get selected indices

      if (selectedIndices.Length > 0)//if any selected
      {
           foreach (int index in selectedIndices)//iterate through the items
           {
               //use RemoveAt to remove an item located at a specific index
               lst_Categories.Items.RemoveAt(index);
           }
      }
}
Please note that GetSelectedIndices() is only available for List Box control. In the following blog posts, we will learn how to add and remove items with object-oriented approach.


Pingback: Using Objects and Classes with List Controls | Web Applications with Asp.Net Entity Framework