In this tutorial, we will pretend that we have a database by using ViewState to store some instances of a class. Then, we will retrieve the data stored in the ViewState and bind this data to the list box. Please note that this way of using ViewState is actually not a good practice. We employed this approach here to introduce how to use object-oriented approach when working with list controls, which will prepare you for binding data by using a real database.
A Brief Introduction to Object-Oriented Programming
In OOP, everything is based on classes and the objects, which are instances of classes. A class can be considered as a template that defines characteristics and the behavior of objects. You can create many instances (or objects) from a class. Each instance will share all characteristics that are defined in the class. Let’s say there is a class called Student, then you can create a new Student instance like this:
Student myStudent = new Student();
Classes are defined by their properties and the methods. Let’s assume that Student class will have FirstName and LastName properties, and GetFullName() method. Here is the declaration of the Student class:
public class Student
{
    private string _firstname; //the _firstname field
    public string FirstName //the FirstName property
    {
        get { return _firstname; }//get accessor returns the existing firstname
        set { _firstname = value; }//set accessor assigns a new firstname
    }

    private string _lastname; //the _lastname field
    public string LastName //the LastName property
    {
       get { return _lastname; }//get accessor returns the existing lastname
       set { _lastname = value; }//set accessor assigns a new lastname
    }

    public string GetFullName()//the GetFullName method (returns a string)
    {
         return FirstName + " " +  LastName;//merge the firstname and lastname, and return it
    }
}
You may notice that in the declaration of the properties there are two methods: get and set, which are called Accessors of a property.
Get Accessor:
- This accessor is invoked when we reads the a property value of an object. For example, when we want to access the first name of an student (with this code: myStudent.FirstName), the Get accessor will we invoked.
- Then, the Get accessor will return the value of the property which is _firstname according to the class definition above. If you omit Get accessor, the property will be implemented as a Write-Only property, therefore the value of the property (i.e., FirstName) would not be read.
Set accessor:
- This accessor is invoked when you want to change the value of the property. For example, when you want to change the existing name of an student object (myStudent.FirstName = “Erkan”), the Set accessor will be invoked.
- Then, the Set accessor will read the user input through the value object (defined in C#), and update the _firstname (_firstname = value;) accordingly. If you omit Set accessor, the property will be implemented as a Write-Only property, therefore the value of the property could not be changed (i.e., Read-Only property).
Auto-Implemented Properties
With C# 3.0 and later, Auto-Implemented Properties were introduced. Auto-Implemented Properties allows a very concise accessor declaration with no additional logic required:
public class Student
{
    public string FirstName { get;set; }

    public string LastName { get; set; }

    public string GetFullName()//the GetFullName method (returns a string)
    {
         return FirstName + " " +  LastName;//merge the firstname and lastname, and return it
    }
}
Using Objects and Classes with List Controls
We will develop a basic Music Store application by using objects and classes with list controls. In this exercise, we will use ViewState as our data storage. Please create a new Empty Asp.Net Project in Visual Studio and add a new class, named Album.cs, and define it as follows:
public class Album
{
    public Album() { }//empty constructor

    public Album(int id, string title, int year)//constructor with initial values if preferred
    {
        AlbumId = id;
        AlbumTitle = title;
        AlbumYear = year;
    }

    public int AlbumId { get; set; }//property

    public string AlbumTitle { get; set; }//property

    public int AlbumYear { get; set; }//property

    public string GetFullTitle()//method that merges the title and the year
    {
        return AlbumTitle + " (" + AlbumYear.ToString() + ")";
    }
}
In class definitions, there must be at least one constructor. Constructors determine how you create an instance from the class. In the Album class above we defined two constructors, which means we can create an Album instance in two different ways:
//with no initial values provided
Album myAlbum1 = new Album();

//with initial values provided
Album myAlbum2 = new Album(1, "Best of Pop", 2009);
Even if you do not have any constructor in your class definition, .NET will let you use the empty constructor when creating new instances.
Please add a new web form to your project, and add a list box to the form:
Let’s switch back to the CodeBehind file and define a method, called CreateAlbumStorage(), which creates the ViewState storage for the albums. Please note that only for this example we will use ViewState for storing objects, however, in general it is not a good practice to use ViewState to store the objects.
public void CreateAlbumStorage()
{
    //Check if the viewstate storage exists. If it doesn't, create it.
    if (ViewState["albums"] == null)
    {
        List<Album> albums = new List<Album>();

        //First approach: With initial values
        //Values are set when the object is created
        Album albumItem1 = new Album(1, "Album1", 2000)
        albums.Add(albumItem1);

        //Second approach: With no initial values
        //Values are set after the object is created
        Album albumItem2 = new Album();
        albumItem2.AlbumId = 2;
        albumItem2.AlbumTitle = "Album2";
        albumItem2.AlbumYear = 2005;
        albums.Add(albumItem2);

        //Third approach: Same as the Second approach
        //with a different syntax
        Album albumItem3 = new Album()
        {
             AlbumId = 3,
             AlbumTitle = "Album3",
             AlbumYear = 2010
        };
        albums.Add(albumItem3);

        //Store the albmums
        ViewState["albums"] = albums;
    }
}
We created an album storage –ViewState[“albums”]– that contains three instances of Album class. Now let’s define another Method, BindExistingAlbums(), to display the albums in the list box:
public void BindExistingAlbums()
{
     //Then bind the albums in the storage to the list box
     List<Album> albums = (List<Album>)ViewState["albums"];
     lst_Albums.DataSource = albums;
     lst_Albums.DataTextField = "AlbumTitle";//What to display in the list box.
     lst_Albums.DataValueField = "AlbumId";//The associated value with the list item.
     lst_Albums.DataBind();
}
As described in another tutorial, DataTextField helps you determine what to display in the list control, whereas DataValueField helps you to keep a unique identifier associated with the list items. We used these two properties in the above code to indicate that we want to display the AlbumTitle in the list box (lst_Albums.DataTextField = “AlbumTitle”), and we want to persist the AlbumId value for each album in list box. This way, later we can access the AlbumId of the selected album by using SelectedItem.Value property (or SelectedValue), and use it to perform some operations (such as deleting or editing an album).
We will need to call the two methods we defined above in Page_Load method:
protected void Page_Load(object sender, EventArgs e)
{
    if (!Page.IsPostBack)
    {
         //First create the storage
         CreateAlbumStorage();

         //Then bind the albums in the storage to the list box
         BindExistingAlbums();
    }
}
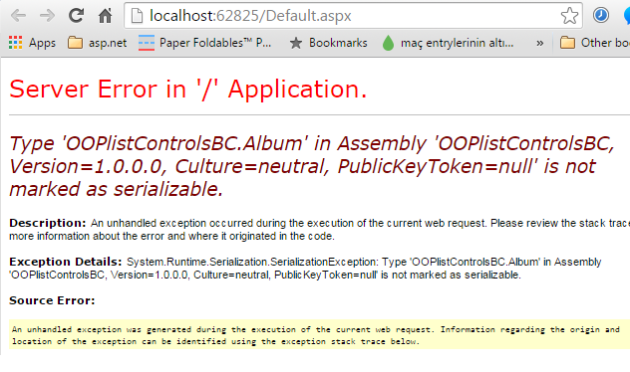
When you run the application, you are supposed to see the following error screen:
This is because, whatever is stored inside ViewState, it needs to be serialized (converted into text form). Therefore, we need to turn on serializability of the Album class. We just need to add the Serializable keyword at the class definition:
[Serializable]
public class Album
{
    public Album() { }

    .........
    ......
    ....
    ..
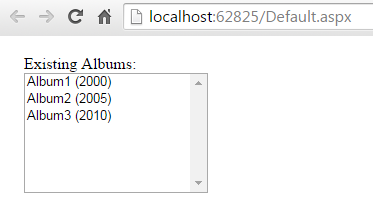
After adding the Serializable keyword, when you run the application you should see the following page:
Everything looks great. What if we want to display the year information next to the album title, like this:
Do you remember the Album class has a method called GetFullTitle that combines the album title and the year together like this:
public string GetFullTitle()
{
     return AlbumTitle + " (" + AlbumYear.ToString() + ")";
}
Why not assigning this GetFullTitle method to the DataTextField property of the list box? That would be a cool idea however the problem is that DataTextField (and DataValueField) accepts ONLY a property of an object. A method cannot be assigned to DataTextField. If you try the following code:
List<Album> albums = (List<Album>)ViewState["albums"];
lst_Albums.DataSource = albums;
lst_Albums.DataTextField = "GetFullTitle";//HERE WE ASSIGNED THE METHOD NOT THE PROPERTY
lst_Albums.DataValueField = "AlbumId";
lst_Albums.DataBind();
You will receive the following error:
The error message clearly says that the compiler looked for a property called “GetFullTitle” but could not find a property with the name “GetFullTitle” (because it is method name).
What we can do in this scenario is to discard the GetFullTitle() method in the Album class, and instead create a property that can provide the same functionality:
 public string FullTitle
 {
      get { return AlbumTitle + " (" + AlbumYear + ")"; }
 }
Above, we declared the FullTitle property, which is Read-Only since only the Get accessor is defined. The Get Accessor builds the string that we need and returns it. Now, we can assign the FullTitle property to the DataTextField of the list box:
List<Album> albums = (List<Album>)ViewState["albums"];
lst_Albums.DataSource = albums;
lst_Albums.DataTextField = "FullTitle";//HERE WE ASSIGNED THE PROPERTY
lst_Albums.DataValueField = "AlbumId";
lst_Albums.DataBind();
When you run your application, you should see the list box displays the album items with their year info next to their titles:
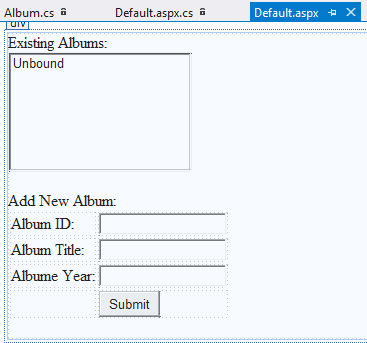
Let’s move forward, and design a simple form to allow users to create new albums. Our form should look like this:
When the user clicks Submit button, the new Album instance should be created added to the albums storage ViewState[“albums”]. Then, the list box should display the updated album list:
protected void btn_CreateAlbum_Click(object sender, EventArgs e)
{
    //create the new instance with the user input
    Album newAlbum = new Album()
    {
        AlbumId = Convert.ToInt32(txt_AlbumId.Text),
        AlbumTitle = txt_AlbumTitle.Text,
        AlbumYear = Convert.ToInt32(txt_Year.Text)
    };

    //Retrieve the album list
    List<Album> albums = (List<Album>)ViewState["albums"];

    //add the new item to the list
    albums.Add(newAlbum);

//we need to update the viewstate with the new albums list
ViewState["albums"] = albums;
BindExistingAlbums();//display the albums
}
In the above code, first we retrieved the existing album collection from the ViewState. Next, we added the newAlbum object to the collection. Then, we saved the updated albums collection back to the ViewState. Last, we called the BindExistingAlbums which will fetch the album collection from the ViewState and populate the list box with it.
Let’s work on another tasks: Removing the selected item from the album list box. For this, please add a button under the list box, and name it Remove.
Now double-click on the button to generate its event handler. Here is how we would implement the deletion operation normally:
int selectedAlbumId = Conver.ToInt32(lst_Albums.SelectedValue);

Album albumToDelete = new Album();

List<Album> existingAlbums = (List<Album>) ViewState["albums"];
foreach(Album albumitem in existingAlbums)
{
     if(albumitem.AlbumId == selectedAlbumId)
     {
          albumToDelete = albumitem;
          break;
     }
}
existingAlbums.Remove(albumToDelete);

ViewState["albums"] = existingAlbums;

BindExistingAlbums();
And, it gets more complicated if we want allow the user to delete multiple items at once:
List<Album> albumsToDelete = new List<Album>();
List<Album> existingAlbums = (List<Album>) ViewState["albums"];
foreach(ListItem album in existingAlbums){
    if(album.Selected) {
        int albumIdToDelete = Convert.ToInt32(album.Value);
        foreach(Album albumItem in existingAlbums) {
           if(albumItem.AlbumId == albumIdToDelete) {
               albumsToDelete.Add(albumItem);
           }
        }
    }
}
existingAlbums.RemoveRange(albumsToDelete);

ViewState["albums"] = existingAlbums;

BindExistingAlbums();
Lambda Expressions
For the delete operation we will use the RemoveAll() method of List type collections. RemoveAll removes all the elements that meet a condition written by the Lamda Expressions. The condition we will need is whether the AlbumId of the album object matches the value of the albumid variable:
albums.RemoveAll(a => a.AlbumId == albumid);
With the code line above this tutorial ends. You can run your application and test it by adding/removing albums. It should work.
To learn more about querying items (Linq-to-Objects) and also learn about the Lambda Expressions please refer to this tutorial.


